
서론
이 장에서는 Raspberry PI에서 MobileNetV2를 Coral Edge TPU를 사용해 inference하는 방법과 필요한 환경셋팅 대해서 설명한다.
목차
- 1. Requirements
- 2. Install Ubuntu
- 3. Setting Ubuntu
- 4. Install Package
- Test MobileNetV2
- tf.keras.application에서 제공하는 MobileNetV2
- ONNX(Model Zoo)에서 제공하는 MobileNetV2
- TF-Lite Inferece(Without using TPU)
- 연구 결론
1. Requirements
2022-11-22일 기준
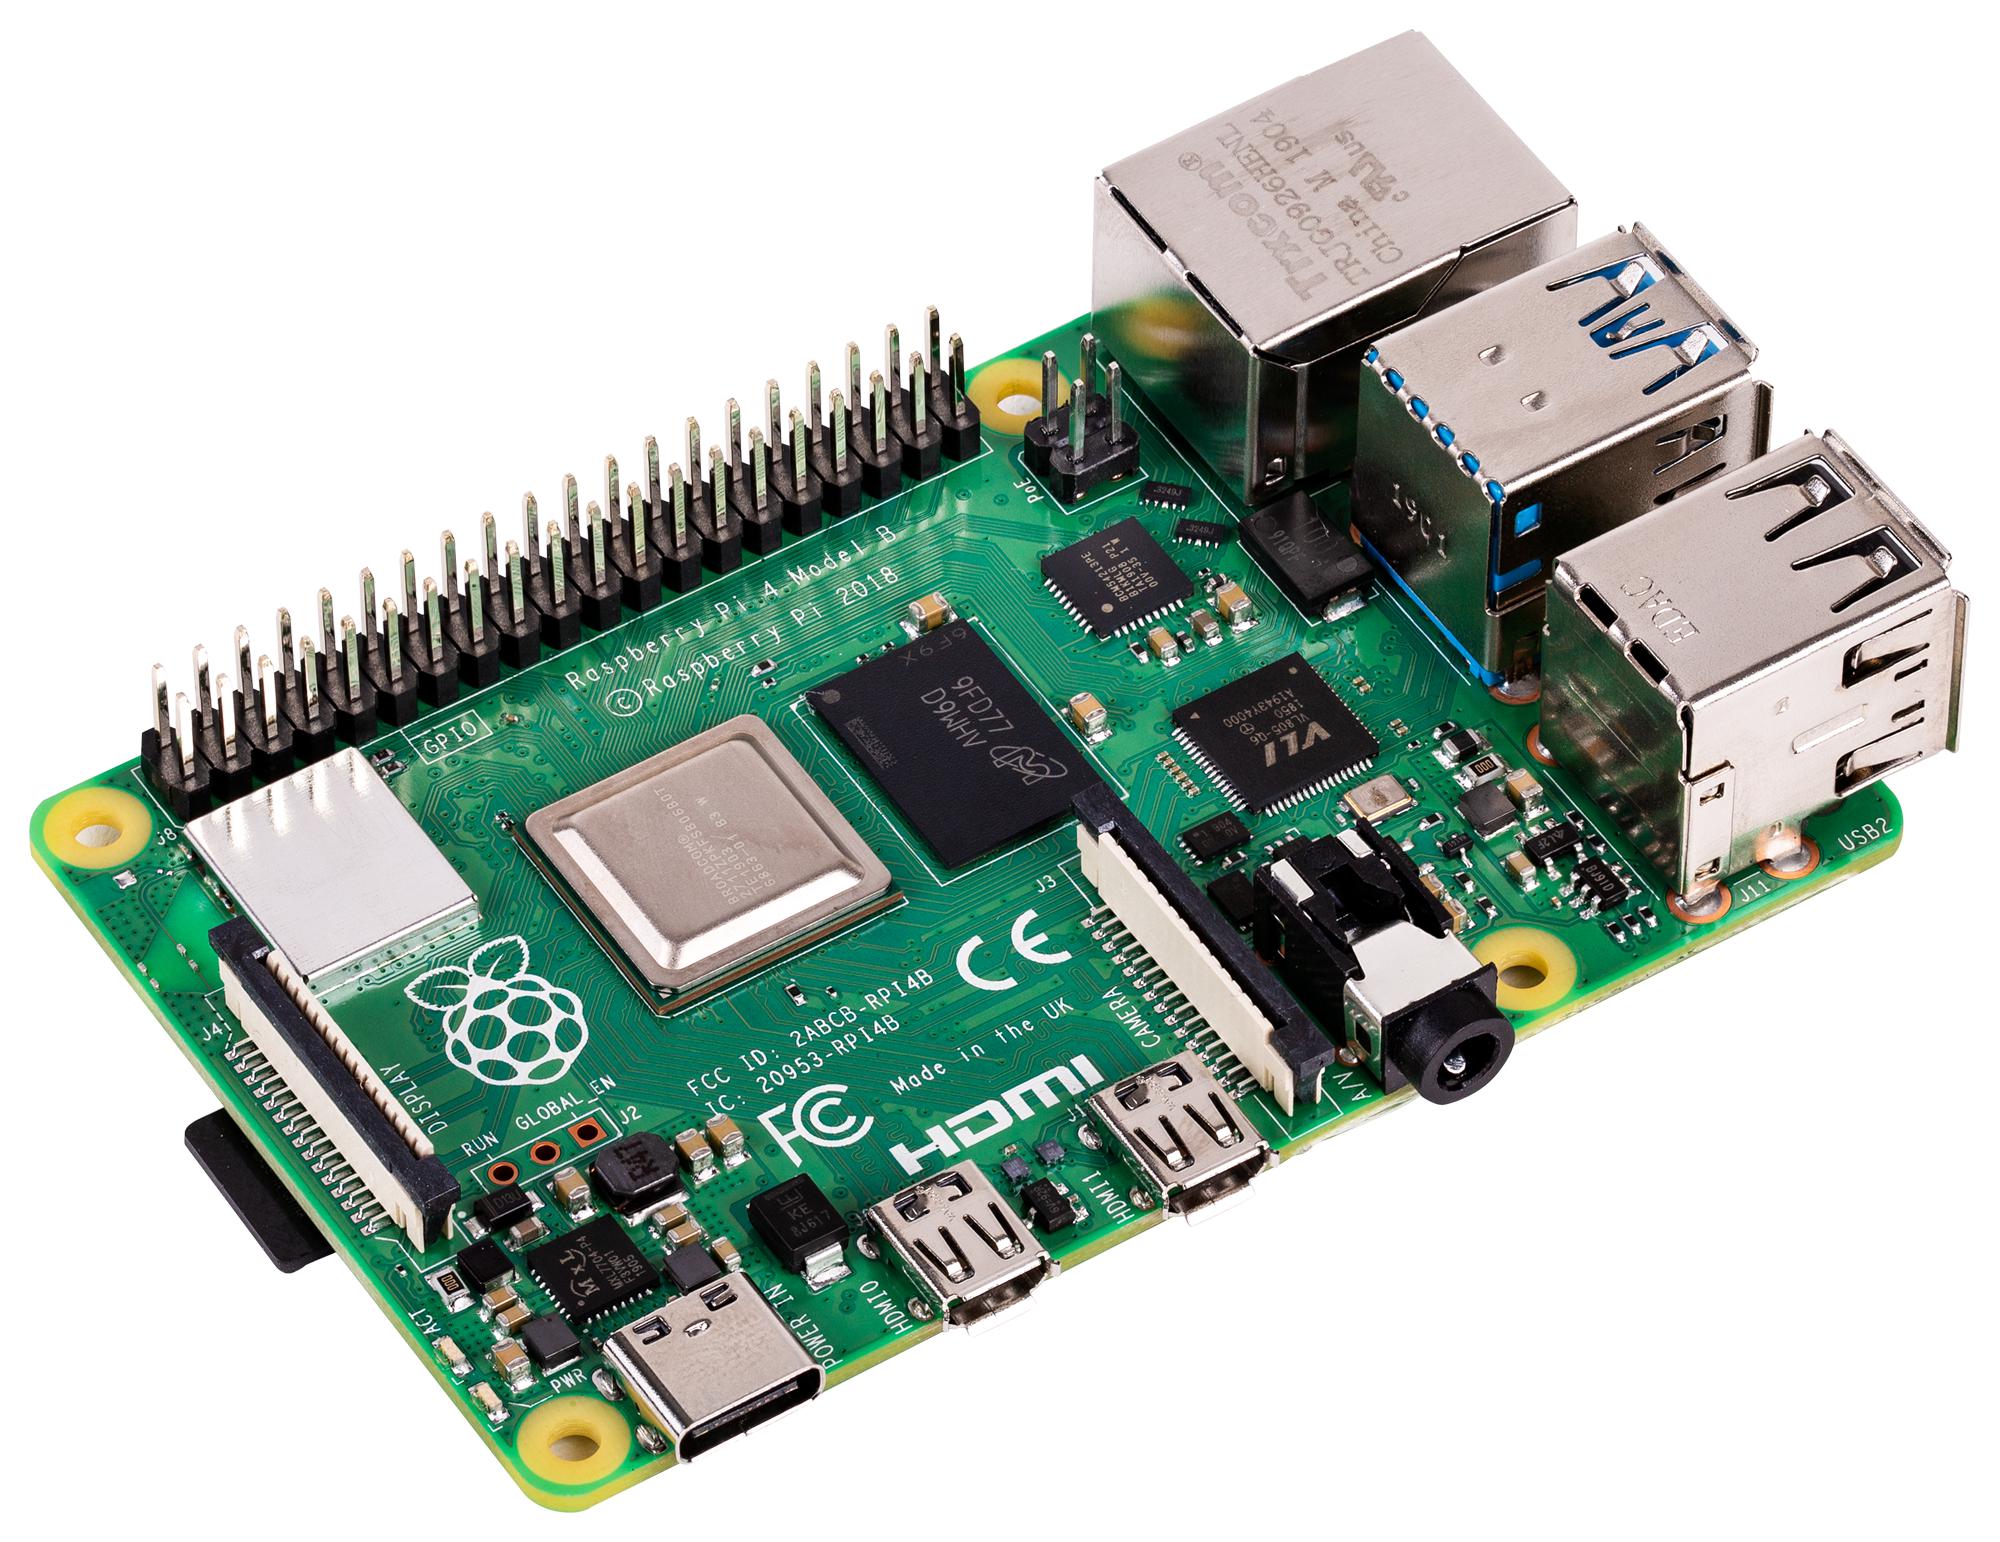
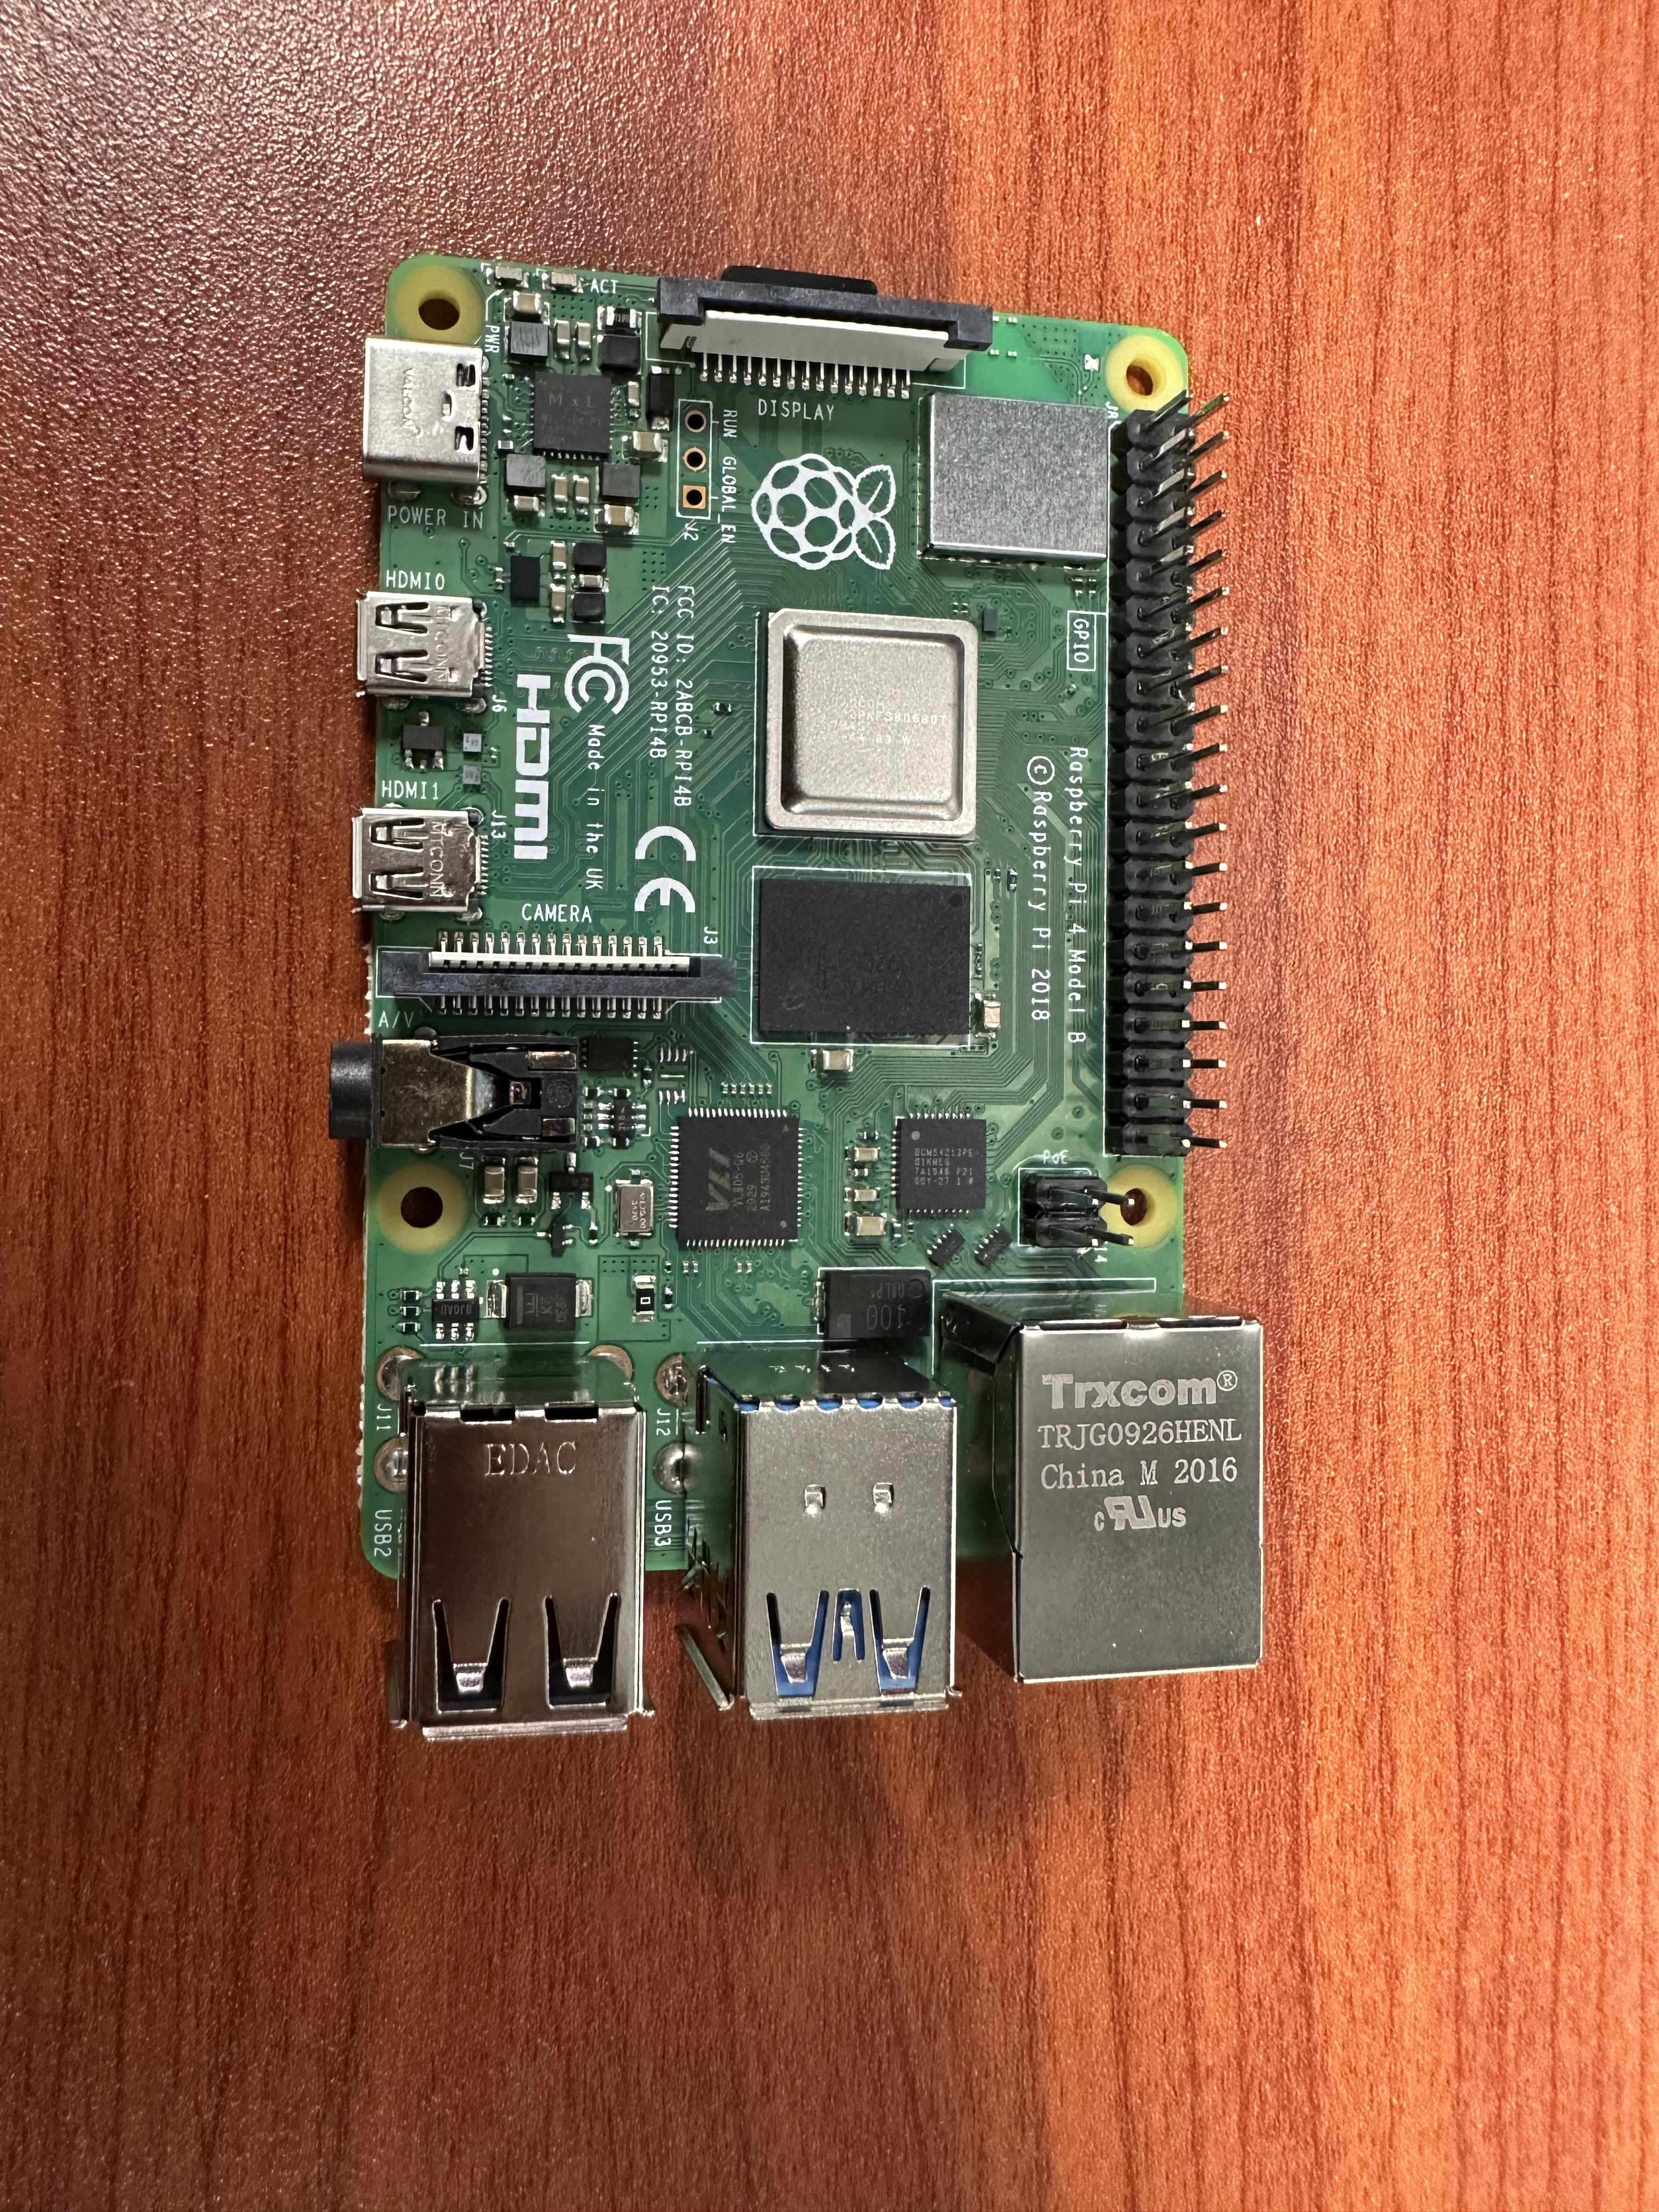
- A computer with one of the following operating systems:
- Linux Debian 10, or a derivative thereof (such as Ubuntu 18.04), and a system architecture of either x86-64, Armv7 (32-bit), or Armv8 (64-bit) (includes support for Raspberry Pi 3 Model B+, Raspberry Pi 4, and Raspberry Pi Zero 2)
- macOS 10.15 (Catalina) or 11 (Big Sur), with either MacPorts or Homebrew installed
- Windows 10
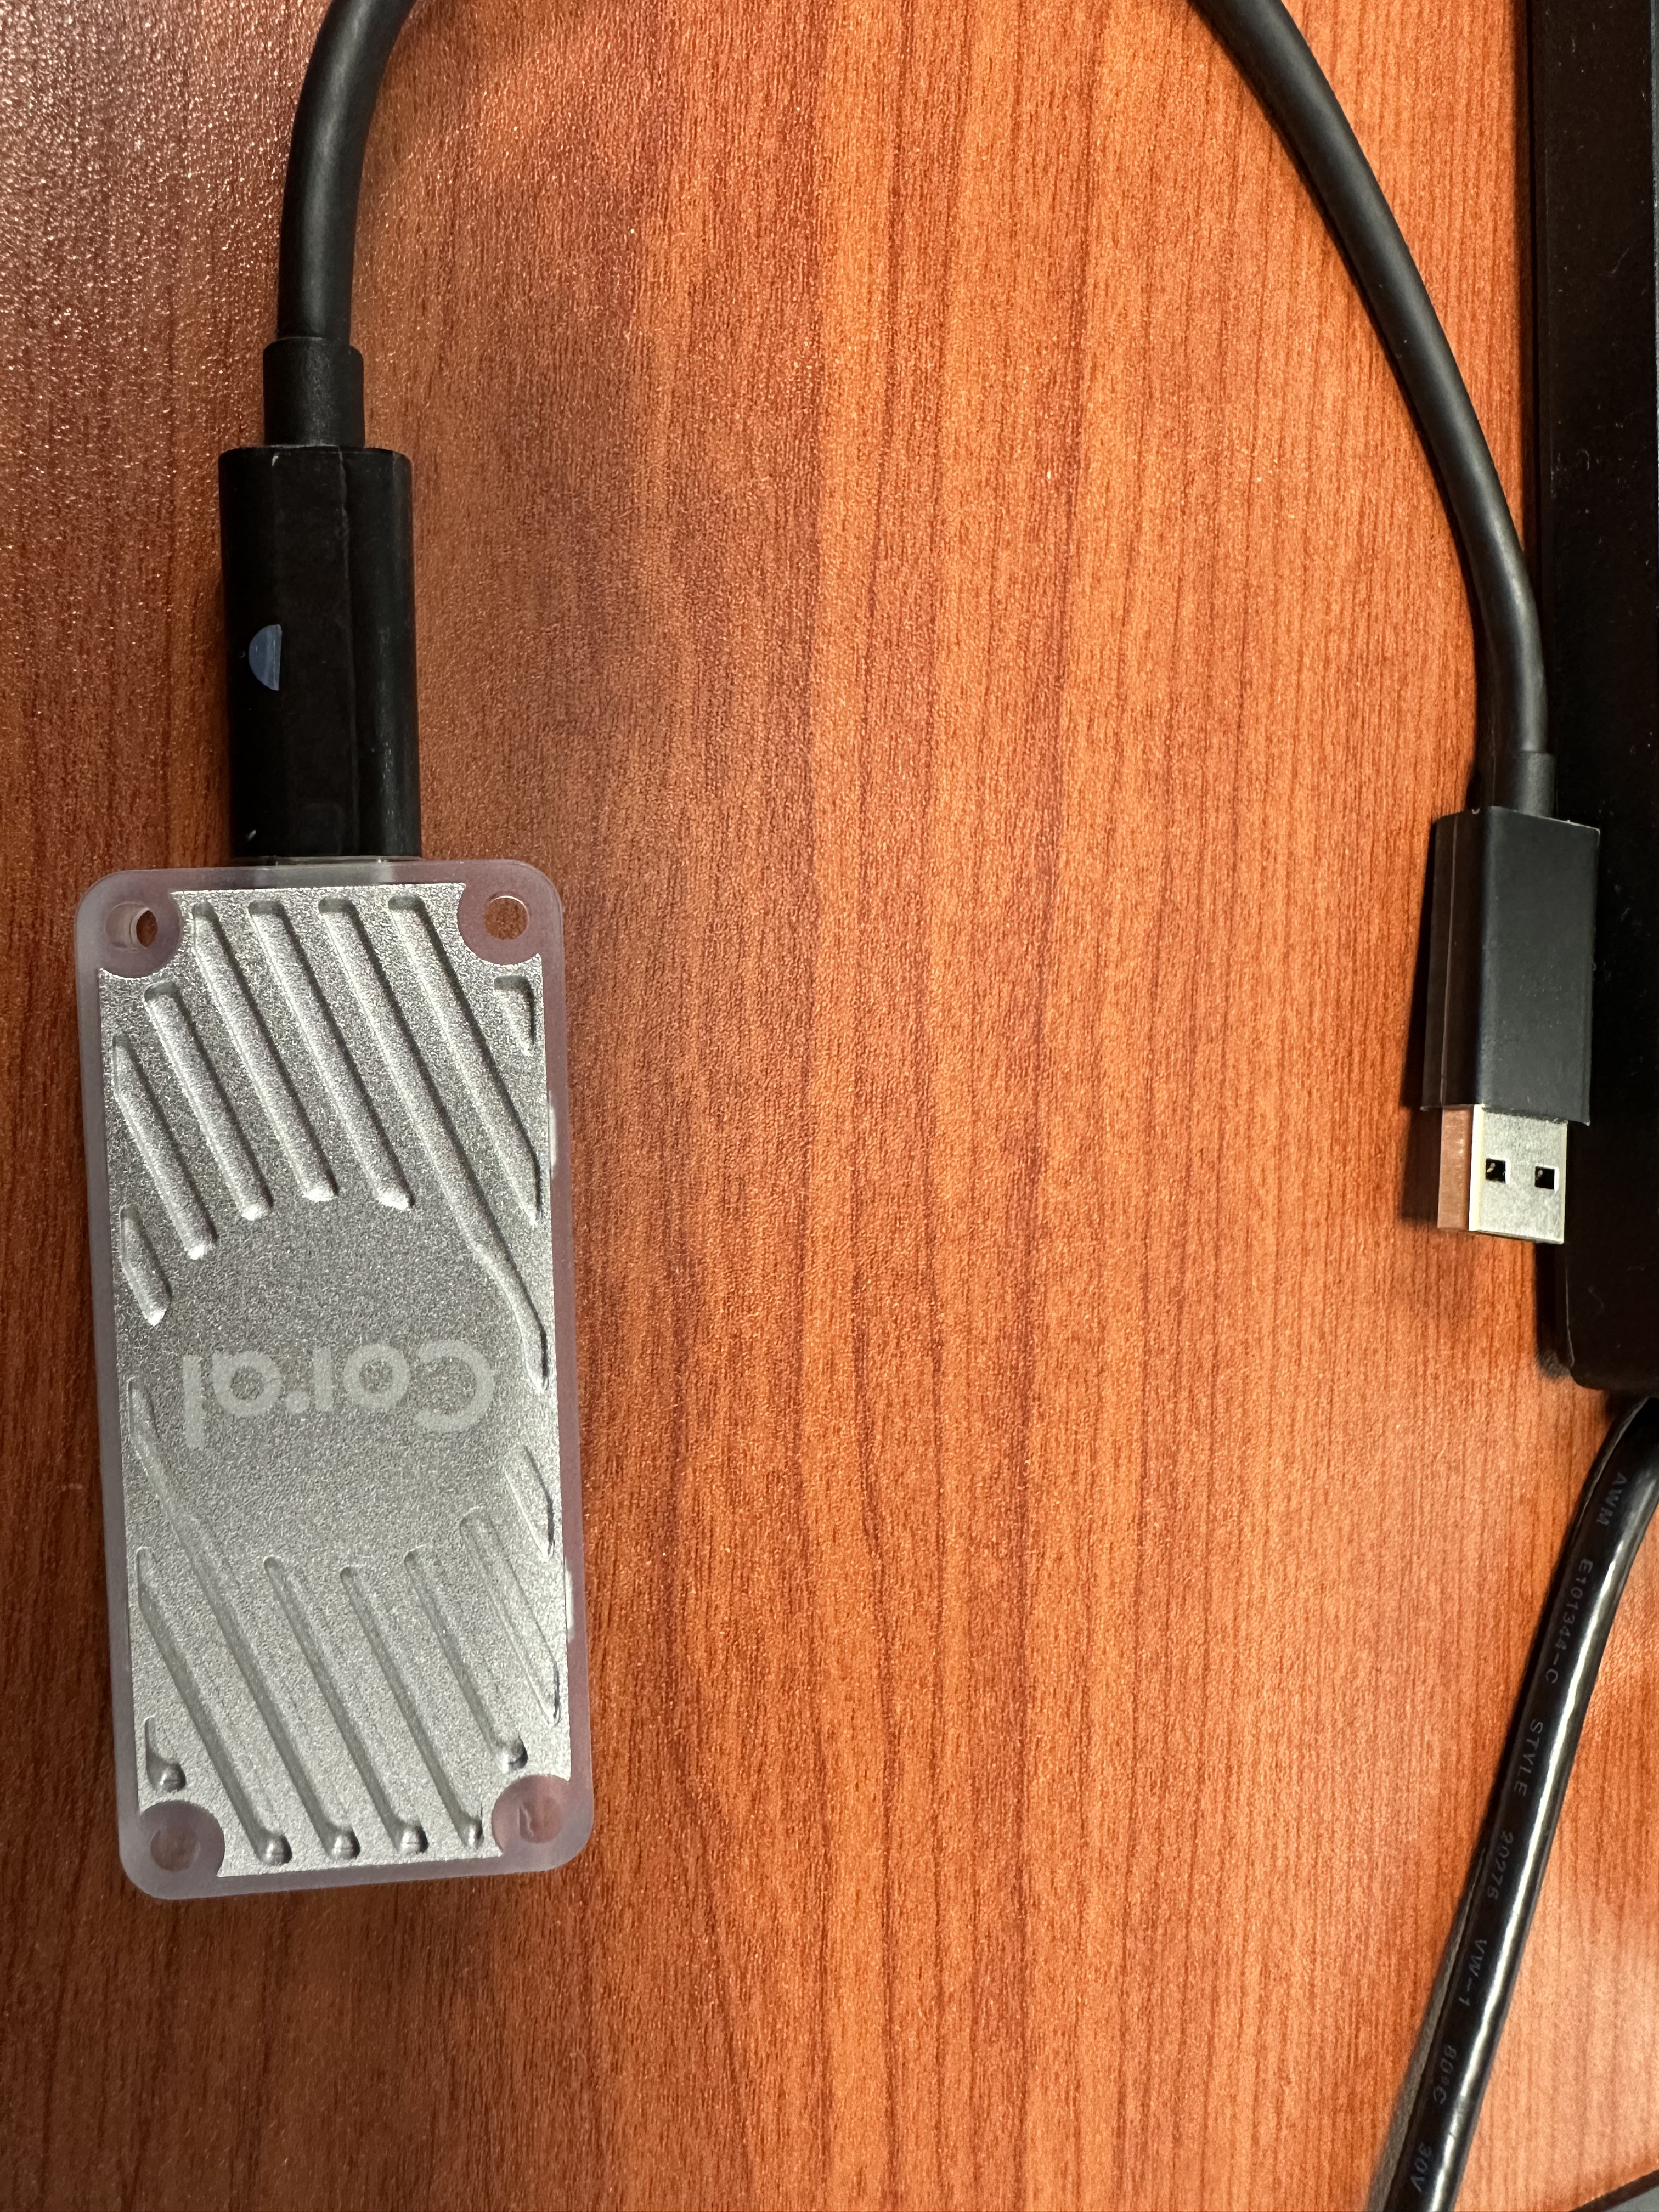
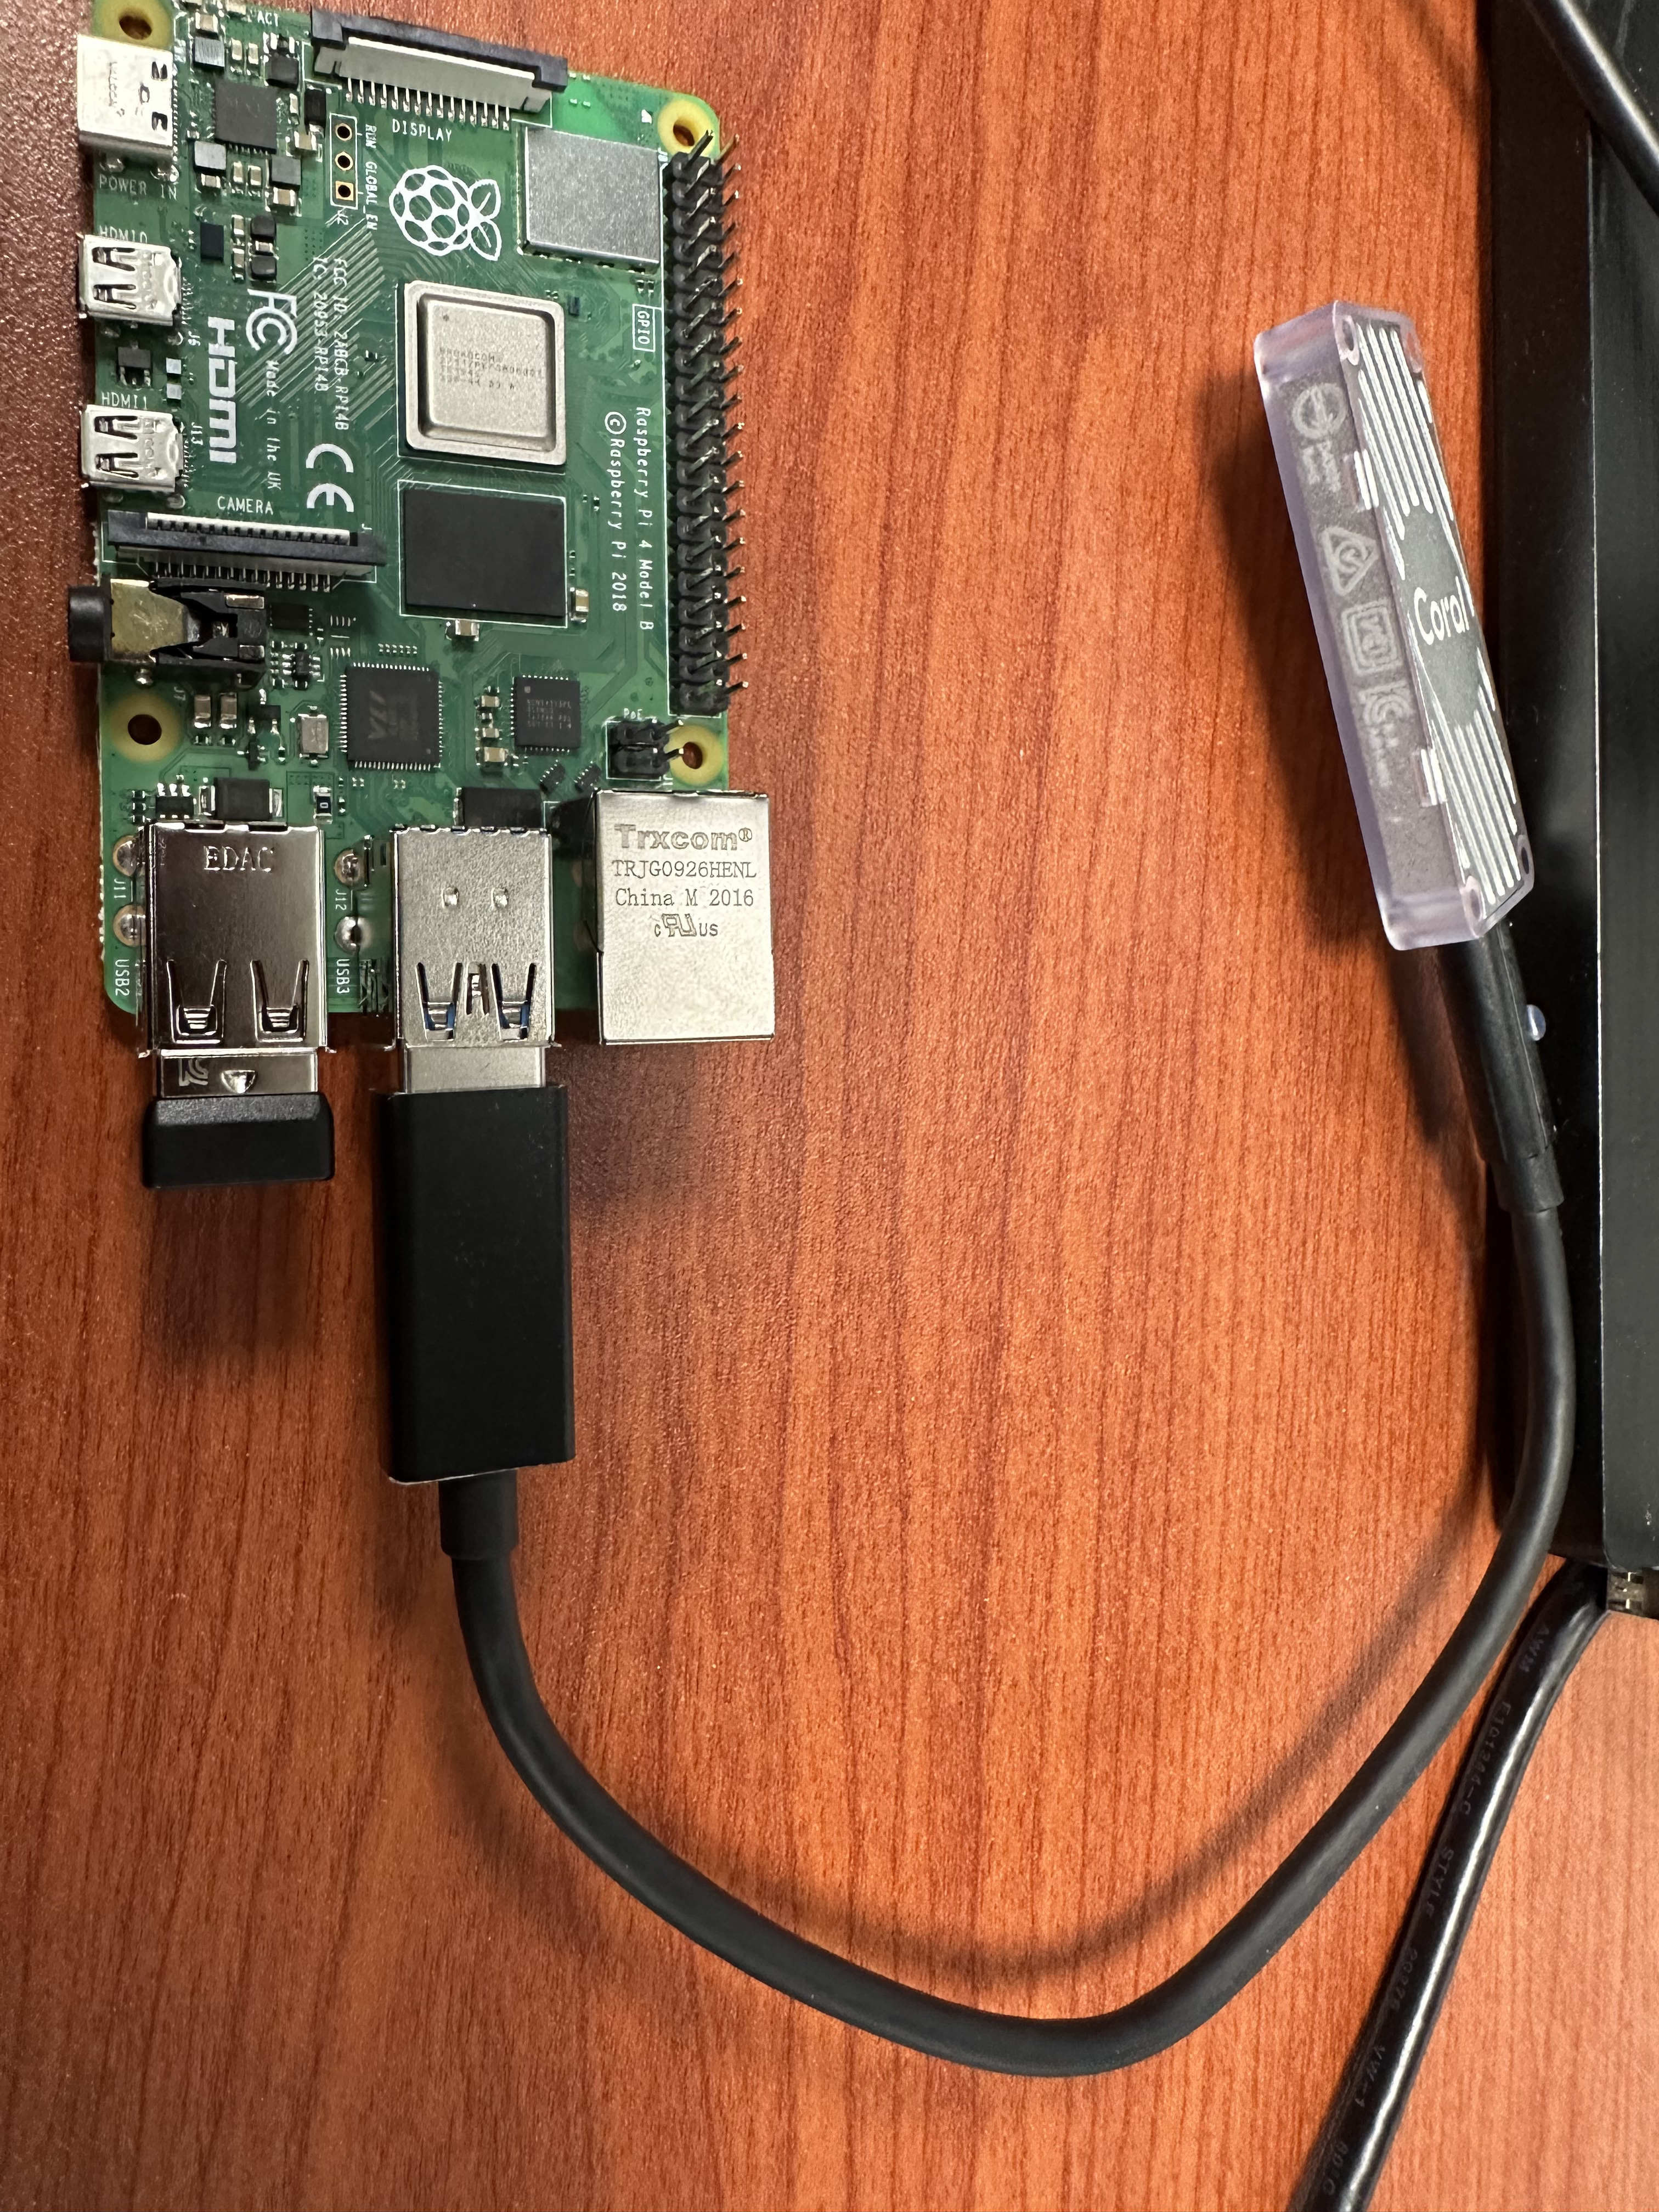
- One available USB port (for the best performance, use a USB 3.0 port)
- Python 3.6 - 3.9
https://coral.ai/docs/accelerator/get-started/#requirements
2. Install Ubuntu
우분투를 설치하는 방법 2가지를 소개한다. 원하는 방법을 선택해 설치하자
방법1. 라즈베리파이에서 제공하는 GUI툴을 이용해 설치
먼저 첫번째 방법을 통해 설치하는법을 설명한다. 아래 링크에서 라즈베리파이 전용 우분투를 설치할 수 있는 방법을 알려준다.
$ sudo apt install snap
$ sudo snap install rpi-imager
https://ubuntu.com/tutorials/how-to-install-ubuntu-on-your-raspberry-pi#1-overview
방법2. Server이미지를 받아서 직접 설치
아래 링크에서 직접 다운받아 설치도 가능하다. 아래 다운받은것은 Server(CLS)용 64bit Architecture.
https://releases.ubuntu.com/20.04.5/?_ga=2.70319312.1797486237.1670478267-1298739506.1669605918
해당 이미지를 아래 프로그램을 사용해서 USB에 fetch 한다.
아래 블로그에서 balenaEtcher로 USB에 설치하는 방법을 상세히 올려놓았다. 참고하자
https://chmodi.tistory.com/115
3. Setting Ubuntu
서버버전의 초기 아이디와 비밀번호는 전부 ubuntu이다. 그 후 자동으로 비밀번호를 변경하라고 나온다.
무선 네트워크 설정
로그인하고 비빌면호 변경까지 완료했다면 아래 설정 파일을 열어주자
$ sudo nano /etc/netplan/50-cloud-init.yaml들여쓰기 하나당 띄어쓰기 4번이다. {name}에 wifi이름, {password}에 비밀번호를 입력 → Tap을 사용하지 말고 space바를 사용
network:
		ethernets:
				eth0:
						dhcp4: true
						optinal: true
		version: 2
		wifis:
				wlan0:
						optional: true
						access-points:
								"SSID-NAME-HERE":
									  password: "PASSWORD-HERE"
						dhcp4: true
설정 파일을 저장한 후에는 아래 코드를 꼭 입력해서 적용시켜야 한다.
$ sudo netplan apply에러가 난 경우에는 debug옵션을 붙이면 자세한 이유를 알 수 있다.
$ sudo netplan apply --duebughttps://velog.io/@gilchris/Ubuntu-20.04-terminal%EC%97%90%EC%84%9C-wifi-%EC%9E%A1%EA%B8%B0
https://linuxconfig.org/ubuntu-20-04-connect-to-wifi-from-command-line
Ubuntu Desktop 설치
무선네트워크에 연결되면 아래 명령어를 통해 Desktop을 설치하고 재부팅하면 된다.
$ sudo apt update
$ sudo apt-get install ubuntu-desktop
$ sudo reboot
Ram Swap Setting
Raspi의 Ram이 적어서 속도가 느리므로 메모리 Swap을 사용해 늘려준다.
아래 명령어는 swapfile이라는 이름으로 2GB의 Swapfile을 생성한다.
$ sudo fallocate -l 2G /swapfileSwapfile의 권한을 수정 해줍니다. 600은 root 계정만 읽기/쓰기가 가능하다는 의미다.
$ sudo chmod 600 /swapfile이제 생성한 Swapfile로 Swap Memory를 활성화한다.
$ sudo mkswap /swapfile
$ sudo swapon /swapfile
마지막으로 시스템을 재부팅해도 Swap이 적용되도록 한다. 아래 파일을 열어준다.
$ sudo nano /etc/fstab그리고 아래 내용을 추가
/swapfile swap swap defaults 0 0잘 되었는지 확인
$ freehttps://facerain.club/swap-memory/
Ubuntu 한글 설정
https://shanepark.tistory.com/231
Find Architecture
$ uname -m # aarch64Setting root password
$ sudo passwd root4. Install Package
사용 가능한 패키지들을 업데이트 한다. 그리고 업그레이드 해준다.
$ sudo apt-get update
$ sudo apt-get upgrade
Check Python Version
$ python3 --versionInstall Ananconda
$ cd Downloads
$ bash Anaconda3-2022.10-Linux-aarch64.sh\
$ source ~/.bashrc
https://github.com/conda-forge/miniforge
추가 기능 설치
$ apt-get install python3-pip
$ sudo apt install curl
Install Coral
아래 공식 홈페이지에 나온 Instruction 따라 설치한다.
https://coral.ai/docs/accelerator/get-started/#1-install-the-edge-tpu-runtime
Test MobileNetV2
3가지 출처(Coral, Keras application,ONNX)에 대한 MobileNetV2에 대해서 TPU를 사용해 추론하는 방법을 소개한다.
Coral에서 제공하는 MobileNetV2
이미 Coral에서 uint8-Quantization과 TPU compiler을 해놔서 추가적인 작업이 필요없다. 토글을 통해 받거나 아래 링크에서 받을 수 있다.
https://github.com/google-coral/pycoral
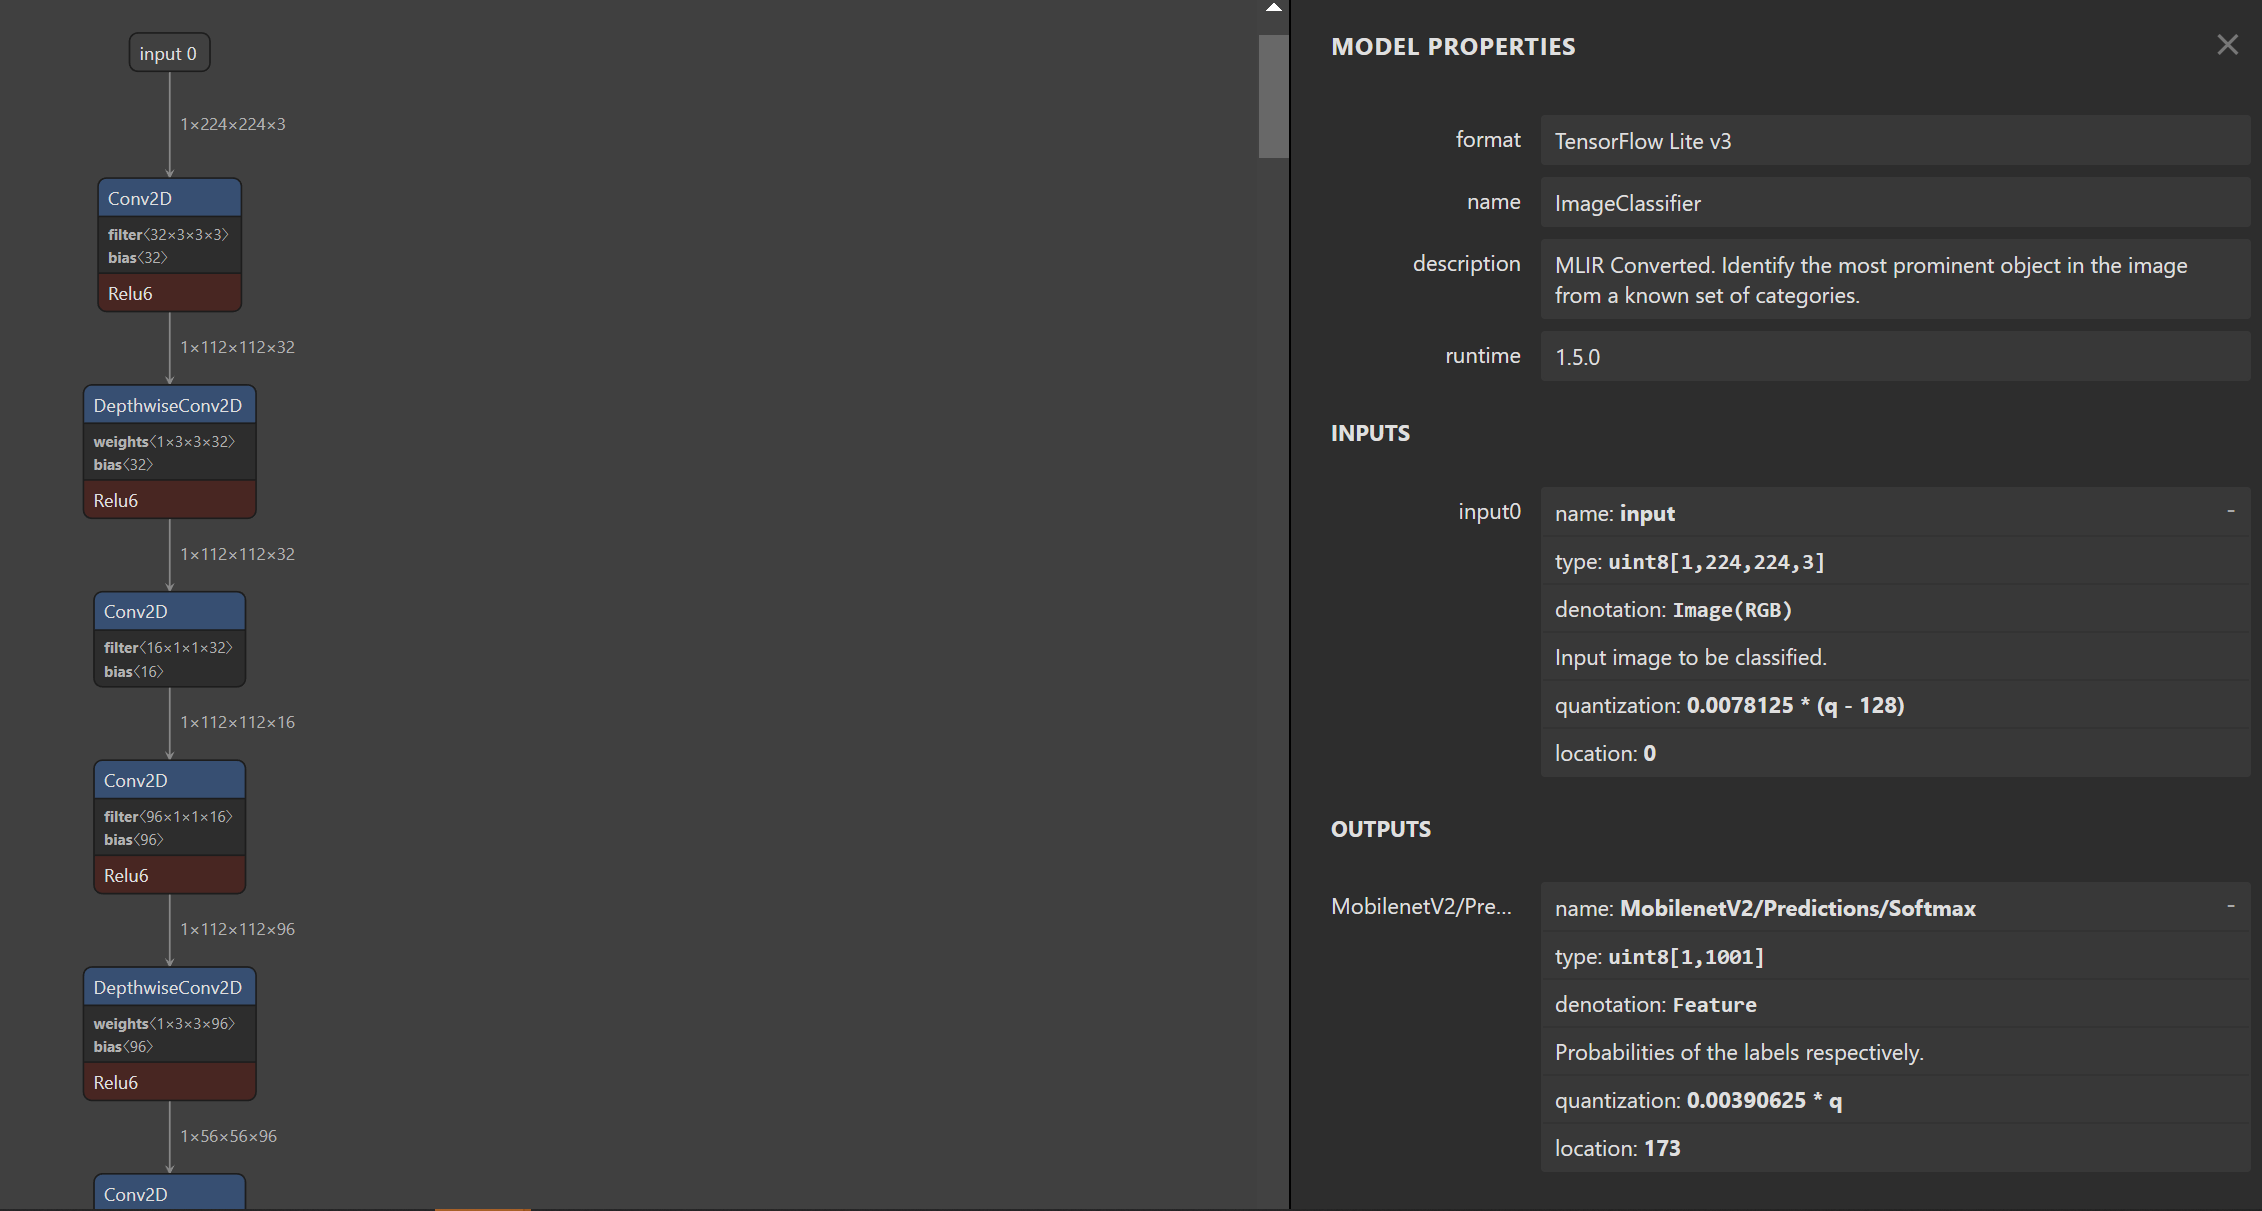
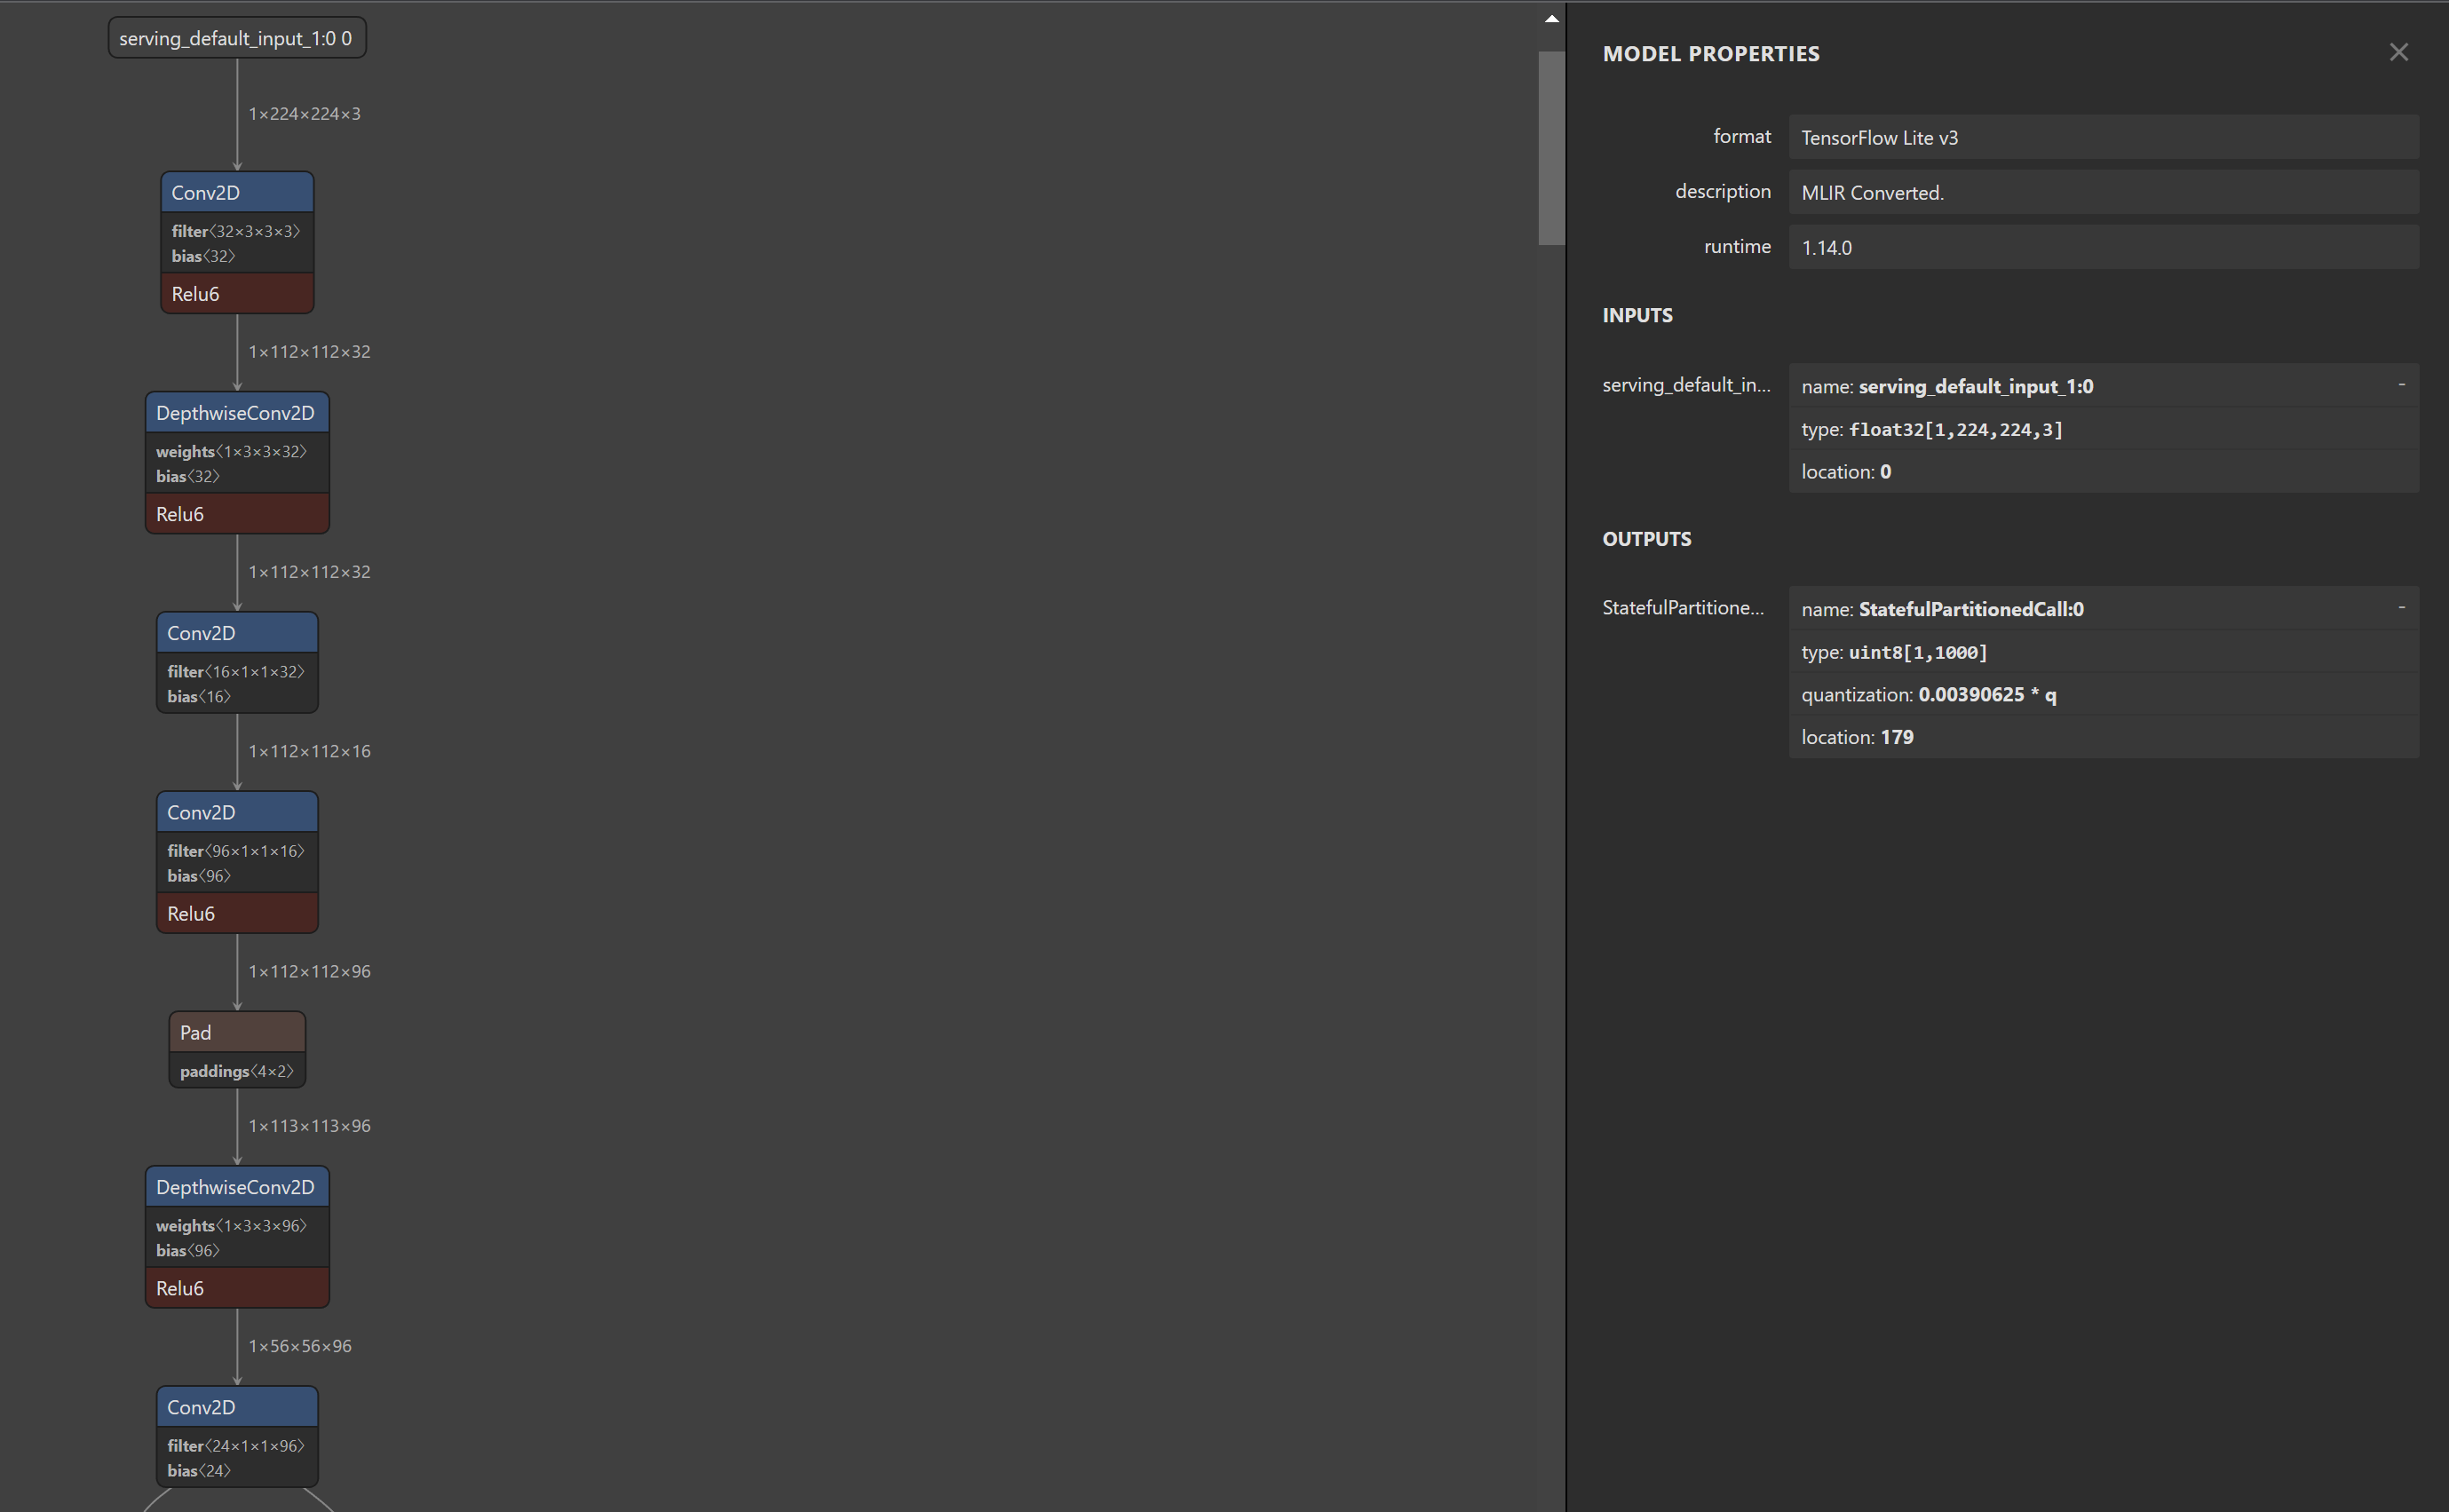
- mobilenet_v2_1.0_224_quant.tflite Structure
- Conv2D 와 Relu6가 합쳐져 있는 것을 볼 수 있는데, 이러한 모델의 경우 TPU에서 사용가능하도록 컴파일이 가능하다.
Coral MobileNetV2 Inference
아래 classify_image.py는 TF-Lite모델을 TPU를 사용해 classification해주는 코드다.
Code(classify_image.py)
# Lint as: python3
# Copyright 2019 Google LLC
#
# Licensed under the Apache License, Version 2.0 (the "License");
# you may not use this file except in compliance with the License.
# You may obtain a copy of the License at
#
#     https://www.apache.org/licenses/LICENSE-2.0
#
# Unless required by applicable law or agreed to in writing, software
# distributed under the License is distributed on an "AS IS" BASIS,
# WITHOUT WARRANTIES OR CONDITIONS OF ANY KIND, either express or implied.
# See the License for the specific language governing permissions and
# limitations under the License.
r"""Example using PyCoral to classify a given image using an Edge TPU.

To run this code, you must attach an Edge TPU attached to the host and
install the Edge TPU runtime (`libedgetpu.so`) and `tflite_runtime`. For
device setup instructions, see coral.ai/docs/setup.

Example usage:
```
bash examples/install_requirements.sh classify_image.py

python3 examples/classify_image.py \
  --model test_data/mobilenet_v2_1.0_224_inat_bird_quant_edgetpu.tflite  \
  --labels test_data/inat_bird_labels.txt \
  --input test_data/parrot.jpg
```
"""

import argparse
import time

import numpy as np
from PIL import Image
from pycoral.adapters import classify
from pycoral.adapters import common
from pycoral.utils.dataset import read_label_file
from pycoral.utils.edgetpu import make_interpreter


def main():
  parser = argparse.ArgumentParser(
      formatter_class=argparse.ArgumentDefaultsHelpFormatter)
  parser.add_argument(
      '-m', '--model', required=True, help='File path of .tflite file.')
  parser.add_argument(
      '-i', '--input', required=True, help='Image to be classified.')
  parser.add_argument(
      '-l', '--labels', help='File path of labels file.')
  parser.add_argument(
      '-k', '--top_k', type=int, default=1,
      help='Max number of classification results')
  parser.add_argument(
      '-t', '--threshold', type=float, default=0.0,
      help='Classification score threshold')
  parser.add_argument(
      '-c', '--count', type=int, default=5,
      help='Number of times to run inference')
  parser.add_argument(
      '-a', '--input_mean', type=float, default=128.0,
      help='Mean value for input normalization')
  parser.add_argument(
      '-s', '--input_std', type=float, default=128.0,
      help='STD value for input normalization')
  args = parser.parse_args()

  labels = read_label_file(args.labels) if args.labels else {}

  interpreter = make_interpreter(*args.model.split('@'))
  interpreter.allocate_tensors()

  # Model must be uint8 quantized
  if common.input_details(interpreter, 'dtype') != np.uint8:
    raise ValueError('Only support uint8 input type.')

  size = common.input_size(interpreter)
  image = Image.open(args.input).convert('RGB').resize(size, Image.ANTIALIAS)

  # Image data must go through two transforms before running inference:
  # 1. normalization: f = (input - mean) / std
  # 2. quantization: q = f / scale + zero_point
  # The following code combines the two steps as such:
  # q = (input - mean) / (std * scale) + zero_point
  # However, if std * scale equals 1, and mean - zero_point equals 0, the input
  # does not need any preprocessing (but in practice, even if the results are
  # very close to 1 and 0, it is probably okay to skip preprocessing for better
  # efficiency; we use 1e-5 below instead of absolute zero).
  params = common.input_details(interpreter, 'quantization_parameters')
  scale = params['scales']
  zero_point = params['zero_points']
  mean = args.input_mean
  std = args.input_std
  if abs(scale * std - 1) < 1e-5 and abs(mean - zero_point) < 1e-5:
    # Input data does not require preprocessing.
    common.set_input(interpreter, image)
  else:
    # Input data requires preprocessing
    normalized_input = (np.asarray(image) - mean) / (std * scale) + zero_point
    np.clip(normalized_input, 0, 255, out=normalized_input)
    common.set_input(interpreter, normalized_input.astype(np.uint8))

  # Run inference
  print('----INFERENCE TIME----')
  print('Note: The first inference on Edge TPU is slow because it includes',
        'loading the model into Edge TPU memory.')
  for _ in range(args.count):
    start = time.perf_counter()
    interpreter.invoke()
    inference_time = time.perf_counter() - start
    classes = classify.get_classes(interpreter, args.top_k, args.threshold)
    print('%.1fms' % (inference_time * 1000))

  print('-------RESULTS--------')
  for c in classes:
    print('%s: %.5f' % (labels.get(c.id, c.id), c.score))


if __name__ == '__main__':
  main()
https://github.com/google-coral/pycoral/tree/master/examples
classify_image.py에 사용되는 라이브러리들(pycoral.utils, pycoral.adapters)에 대한 코드들은 아래 링크에 잘 설명돼 있다. 코드를 수정할 때 참고하자.
https://coral.ai/docs/reference/py/pycoral.utils/
https://coral.ai/docs/reference/py/pycoral.adapters/#module-pycoral.adapters.common
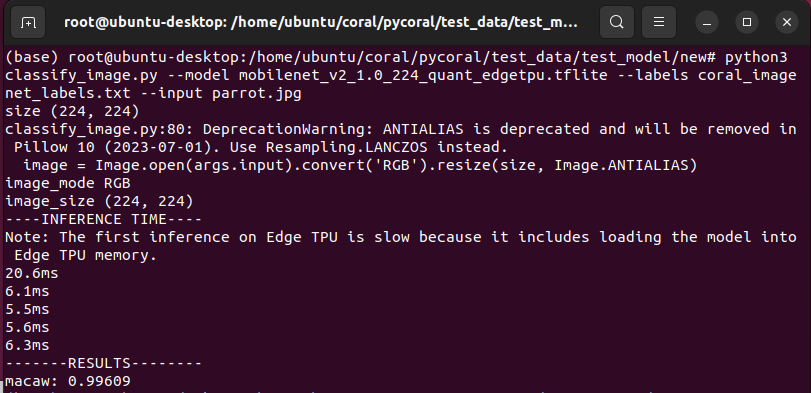
위 코드는 아래 명령어로 사용 가능하다.
python3 classify_image.py \
  --model mobilenet_v2_1.0_224_quant_edgetpu.tflite \
  --labels coral_imagenet_labels.txt \
  --input parrot.jpg
결과는 다음과 같이 나온다.
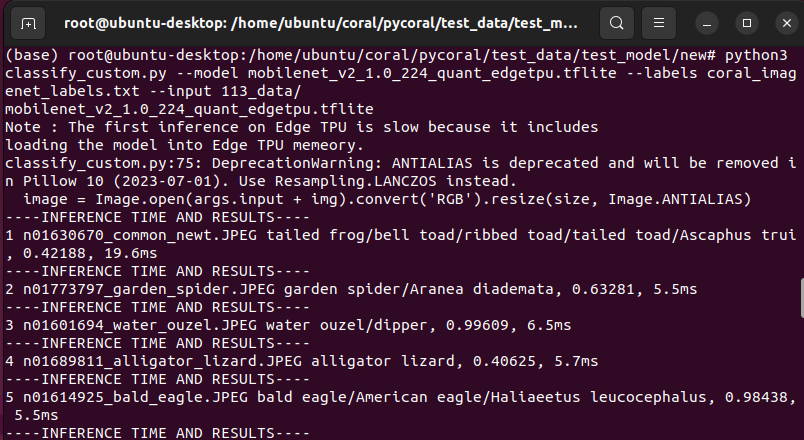
classify_image.py를 수정해 classify_custom.py를 만들어113개의 데이터를 출력하고 CSV파일로 저장하게 끔 만들었다.
Terminal 에서 아래 코드로 실행시킬 수 있다.
python3 classify_custom.py \
  --model mobilenet_v2_1.0_224_quant_edgetpu.tflite \
  --labels coral_imagenet_labels.txt \
  --input 113_data
수정한 classify_custom.py 결과다.
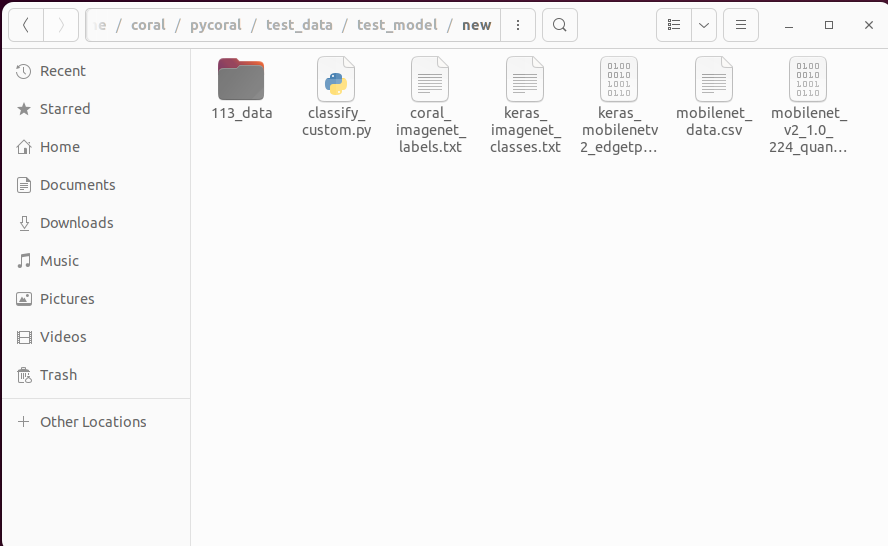
Directory 환경
classify_custom.py 코드
import os
import argparse
import time
import numpy as np
from PIL import Image
from pycoral.adapters import classify
from pycoral.adapters import common
from pycoral.utils.dataset import read_label_file
from pycoral.utils.edgetpu import make_interpreter

def main() :
    parser = argparse.ArgumentParser(
        formatter_class=argparse.ArgumentDefaultsHelpFormatter)
    parser.add_argument(
        '-m', '--model', required=True, help='File path of .tflite file.')
    parser.add_argument(
        '-i', '--input',  required=True, help='Image path.') # input test_data/
    parser.add_argument(
        '-l', '--labels', help='File path of labels file.')
    parser.add_argument(
        '-k', '--top_k', type=int, default=1,
        help='Max number of classification results')
    parser.add_argument(
        '-t', '--threshold', type=float, default=0.0,
        help='Classification score threshold')
    parser.add_argument(
        '-c', '--count', type=int, default=1,
        help='Number of times to run inference')
    parser.add_argument(
        '-a', '--input_mean', type=float, default=128.0,
        help='Mean value for input normalization')
    parser.add_argument(
        '-s', '--input_std', type=float, default=128.0,
        help='STD value for input normalization')
    args = parser.parse_args()

    labels = read_label_file(args.labels) if args.labels else {}

    print(args.model)
    interpreter = make_interpreter(args.model)
    interpreter.allocate_tensors()

    # Model must be uint8 quantized
    if common.input_details(interpreter, 'dtype') != np.uint8 :
        raise ValueError('Only support uint8 input type.')

    size = common.input_size(interpreter)
    params = common.input_details(interpreter, 'quantization_parameters')
    scale = params['scales']
    zero_point = params['zero_points']
    mean = args.input_mean
    std = args.input_std

    image_name = os.listdir(args.input)  # image name
    image_filter = list(filter(lambda x: x.find('.JPEG') != -1, image_name))  # image format filtering


    print("Note : The first inference on Edge TPU is slow because it includes")
    print("loading the model into Edge TPU memeory.")

    f = open("./mobilenet_data.csv","w")
    f.write("ImageName,class,score,inference_time\n")
    i=1
    for img in image_name:

        image = Image.open(args.input + img).convert('RGB').resize(size, Image.ANTIALIAS)

        if abs(scale * std - 1) < 1e-5 and abs(mean - zero_point) < 1e-5:
            # Input data does not require preprocessing.
            common.set_input(interpreter, image)
        else:
            # Input data requires preprocessing
            normalized_input = (np.asarray(image) - mean) / (std * scale) + zero_point
            np.clip(normalized_input, 0, 255, out=normalized_input)
            common.set_input(interpreter, normalized_input.astype(np.uint8))

        print('----INFERENCE TIME AND RESULTS----')
        start = time.perf_counter()
        interpreter.invoke()
        inference_time = time.perf_counter() - start
        classes = classify.get_classes(interpreter, args.top_k, args.threshold)

        for c in classes:
            result = labels.get(c.id, c.id)
            result = result.replace(", ","/")
            print(f"{i} {img} {result}, {c.score:.5f}, {inference_time*1000:.1f}ms")
            f.write(f"{img}, {result}, {c.score:.5f}, {inference_time*1000:.1f}ms\n")
            i += 1

if __name__ == '__main__':
    main()
Download classify_custom.py, coral_imagenet_labels.txt, 113_data.7z, mobilenet_data.csv
tf.keras.application에서 제공하는 MobileNetV2
mobileNetV2 — convert —> TFLite(uint8)
Keras에서 제공하는 Application을 통해 다운받고 TF-Lite로 변환하자. TPU는 uint8만 호한이 가능함으로 변환 할 때 uint8로 바꿔줘야 하며 이때 Calibration Dataset을 이용한다.
- Get MoibleNetV2
model = tf.keras.applications.mobilenet_v2.MobileNetV2( input_shape=(224, 224, 3), alpha=1.0, include_top=True, weights='imagenet', input_tensor=None, pooling=None, classes=1000, classifier_activation='softmax' ) - TF → TF-Lite(Calibration Dataset → Uint8 Quantization)
# for keras model
# A generator that provides a representative dataset
def representative_data_gen():
    image_path = get_image("ImageNet-1000samples")
        yield [image_data]

converter = tf.lite.TFLiteConverter.from_keras_model(model)
# This enables quantization
converter.optimizations = [tf.lite.Optimize.DEFAULT]
# This sets the representative dataset for quantization
converter.representative_dataset = representative_data_gen
# This ensures that if any ops can't be quantized, the converter throws an error
converter.target_spec.supported_ops = [tf.lite.OpsSet.TFLITE_BUILTINS_INT8]
# For full integer quantization, though supported types defaults to int8 only, we explicitly declare it for clarity.
converter.target_spec.supported_types = [tf.int8]
# These set the input and output tensors to uint8 (added in r2.3)
converter.inference_input_type = tf.uint8
converter.inference_output_type = tf.uint8
tflite_model = converter.convert()

with open('mobilenet_v2_quant_uint8.tflite', 'wb') as f:
  f.write(tflite_model)
전체 코드
Code
import tensorflow as tf # 2.10.0
import numpy as np # 1.23.2
from PIL import Image # 9.3.0
import os

def get_image(image_dirs) :
    image_list = []
    for roots, dirs, files in os.walk(image_dirs) :
        for file in files :
            image_dir = os.path.join(roots, file)
            if image_dir.endswith("png") or image_dir.endswith("jpg") or image_dir.endswith("JPEG") :
                image_list.append(image_dir)

    return image_list

# for keras model
# A generator that provides a representative dataset
def representative_data_gen():
    image_path = get_image("ImageNet-1000samples")

    for image in image_path :
        image = Image.open(image).convert('RGB').resize((256, 256), Image.ANTIALIAS)
        image = np.array(image).astype(np.float32) # H, W, C

        image_data = image[16:240, 16:240, :].copy() #center crop

        mean = np.array([0.079, 0.05, 0]) + 0.406 # 0.485, 0.456, 0.406
        std = np.array([0.005, 0, 0.001]) + 0.224 # 0.229, 0.224, 0.225

        for channel in range(image_data.shape[2]):
            image_data[:, :, channel] = (image_data[:, :, channel] / 255 - mean[channel]) / std[channel] #RGB

        image_data = np.expand_dims(image_data, axis=0) # (1, 224, 224, 3)

        yield [image_data]

# Download Model
model = tf.keras.applications.mobilenet_v2.MobileNetV2(
    input_shape=(224, 224, 3),
    alpha=1.0,
    include_top=True,
    weights='imagenet',
    input_tensor=None,
    pooling=None,
    classes=1000,
    classifier_activation='softmax'
)

# convert
converter = tf.lite.TFLiteConverter.from_keras_model(model)
# This enables quantization
converter.optimizations = [tf.lite.Optimize.DEFAULT]
# This sets the representative dataset for quantization
converter.representative_dataset = representative_data_gen
# This ensures that if any ops can't be quantized, the converter throws an error
converter.target_spec.supported_ops = [tf.lite.OpsSet.TFLITE_BUILTINS_INT8]
# For full integer quantization, though supported types defaults to int8 only, we explicitly declare it for clarity.
converter.target_spec.supported_types = [tf.int8]
# These set the input and output tensors to uint8 (added in r2.3)
converter.inference_input_type = tf.uint8
converter.inference_output_type = tf.uint8
tflite_model = converter.convert()

with open('mobilenet_v2_quant_uint8.tflite', 'wb') as f:
  f.write(tflite_model)
이 경우 역시 Coral에서 제공된 TF-Lite모델의 구조와 유사한 것을 볼 수 있다.
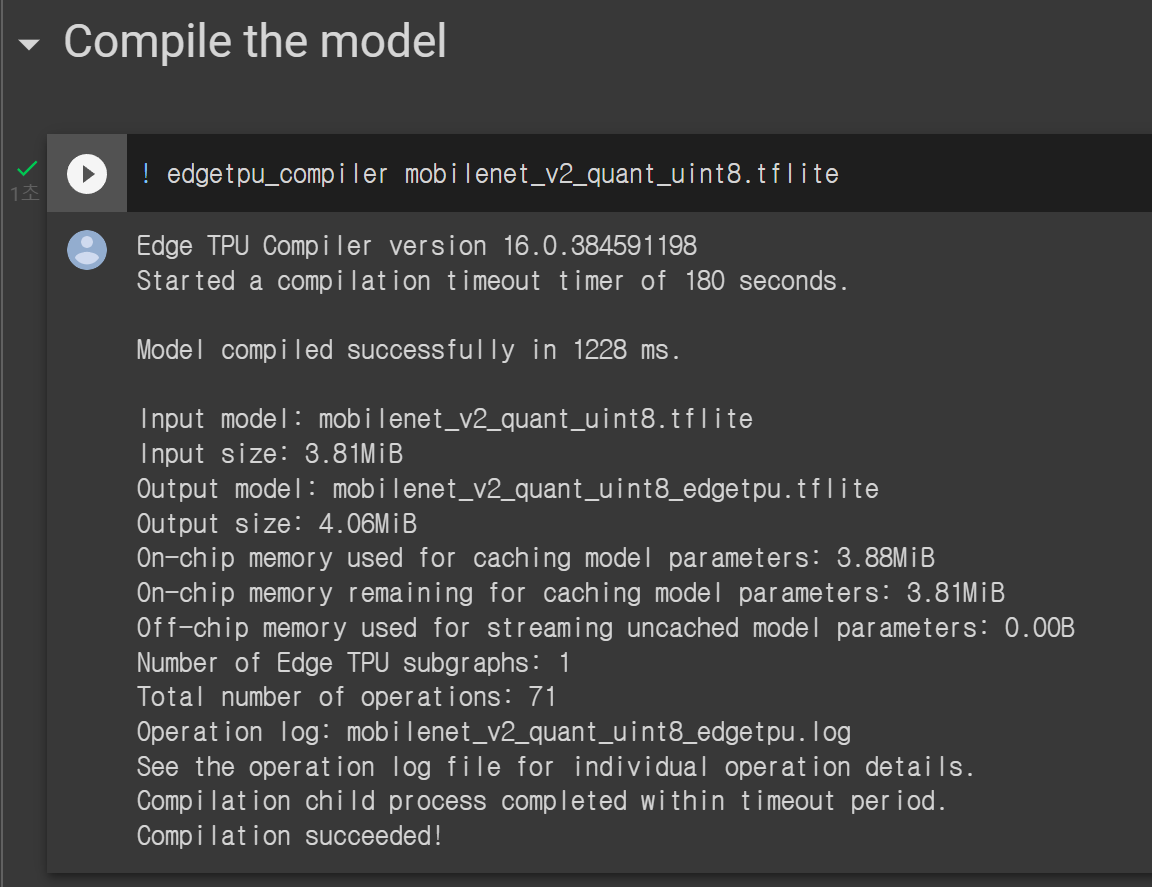
TPU Compile
TFlite(uint8 quantization)이 끝났다면 이제 TPU에서 사용할 수 있도록 컴파일해야 한다.
Requirements (22.11.23 기준)
- The Edge TPU Compiler can be run on any modern Debian-based Linux system. Specifically, you must have the following:
- 64-bit version of Debian 6.0 or higher, or any derivative thereof (such as Ubuntu 10.0+)
- x86-64 system architecture
- If your system does not meet these requirements, try our web-based compiler using Google Colab.
https://coral.ai/docs/edgetpu/compiler/#system-requirements
요구사항이 충족되면 아래 링크의 명령어를 이용해 컴파일 할 수 있다. 나는 코랩을 추천한다. (코랩에서 사용하기)
https://coral.ai/docs/edgetpu/compiler/#download
또는 Pretrained된 모델을 Custom하고 싶다면 아래 코드를 참고하자
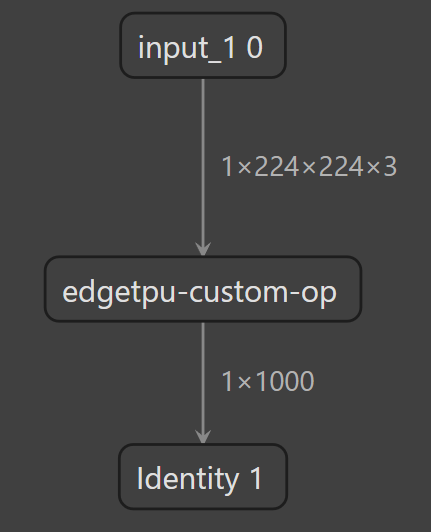
컴파일에 성공하면 아래처럼 뜨며 컴파일된 모델 구조는 다음과 같이 확인된다.
https://coral.ai/docs/edgetpu/models-intro/#supported-operations
Keras MobileNetV2 Inference
python3 classify_custom.py \
  --model keras_mobilenet_v2_quant_uint8_edgetpu.tflite \
  --labels keras_imagenet_classes.txt \
  --input 113_data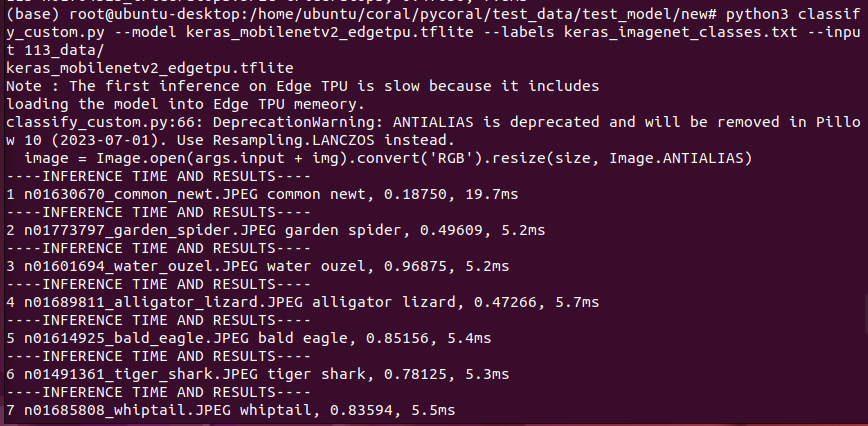
Directory 환경

classify_custom.py 코드
import os
import argparse
import time
import numpy as np
from PIL import Image
from pycoral.adapters import classify
from pycoral.adapters import common
from pycoral.utils.dataset import read_label_file
from pycoral.utils.edgetpu import make_interpreter

def main() :
    parser = argparse.ArgumentParser(
        formatter_class=argparse.ArgumentDefaultsHelpFormatter)
    parser.add_argument(
        '-m', '--model', required=True, help='File path of .tflite file.')
    parser.add_argument(
        '-i', '--input',  required=True, help='Image path.') # input test_data/
    parser.add_argument(
        '-l', '--labels', help='File path of labels file.')
    parser.add_argument(
        '-k', '--top_k', type=int, default=1,
        help='Max number of classification results')
    parser.add_argument(
        '-t', '--threshold', type=float, default=0.0,
        help='Classification score threshold')
    parser.add_argument(
        '-c', '--count', type=int, default=1,
        help='Number of times to run inference')
    parser.add_argument(
        '-a', '--input_mean', type=float, default=128.0,
        help='Mean value for input normalization')
    parser.add_argument(
        '-s', '--input_std', type=float, default=128.0,
        help='STD value for input normalization')
    args = parser.parse_args()

    labels = read_label_file(args.labels) if args.labels else {}

    print(args.model)
    interpreter = make_interpreter(args.model)
    interpreter.allocate_tensors()

    # Model must be uint8 quantized
    if common.input_details(interpreter, 'dtype') != np.uint8 :
        raise ValueError('Only support uint8 input type.')

    size = common.input_size(interpreter)
    params = common.input_details(interpreter, 'quantization_parameters')
    scale = params['scales']
    zero_point = params['zero_points']
    mean = args.input_mean
    std = args.input_std

    image_name = os.listdir(args.input)  # image name
    image_filter = list(filter(lambda x: x.find('.JPEG') != -1, image_name))  # image format filtering


    print("Note : The first inference on Edge TPU is slow because it includes")
    print("loading the model into Edge TPU memeory.")

    f = open("./keras_mobilenet_data.csv","w")
    f.write("ImageName,class,score,inference_time\n")
    i=1
    for img in image_name:

        image = Image.open(args.input + img).convert('RGB').resize(size, Image.ANTIALIAS)

        if abs(scale * std - 1) < 1e-5 and abs(mean - zero_point) < 1e-5:
            # Input data does not require preprocessing.
            common.set_input(interpreter, image)
        else:
            # Input data requires preprocessing
            normalized_input = (np.asarray(image) - mean) / (std * scale) + zero_point
            np.clip(normalized_input, 0, 255, out=normalized_input)
            common.set_input(interpreter, normalized_input.astype(np.uint8))

        print('----INFERENCE TIME AND RESULTS----')
        start = time.perf_counter()
        interpreter.invoke()
        inference_time = time.perf_counter() - start
        classes = classify.get_classes(interpreter, args.top_k, args.threshold)

        for c in classes:
            result = labels.get(c.id, c.id)
            result = result.replace(", ","/")
            print(f"{i} {img} {result}, {c.score:.5f}, {inference_time*1000:.1f}ms")
            f.write(f"{img}, {result}, {c.score:.5f}, {inference_time*1000:.1f}ms\n")
            i += 1

if __name__ == '__main__':
    main()
Download classify_custom.py, keras_imagenet_classes.txt, 113_data.7z, keras_mobilenet_data.csv
ONNX(Model Zoo)에서 제공하는 MobileNetV2
mobileNetV2-12.onnx — convert —> TF(saved_model) —convert—> TFLite(uint8)
mobileNetV2-12.onnx는 아래 링크에서 받을 수 있다.
https://github.com/onnx/models/tree/main/vision/classification/mobilenet/model
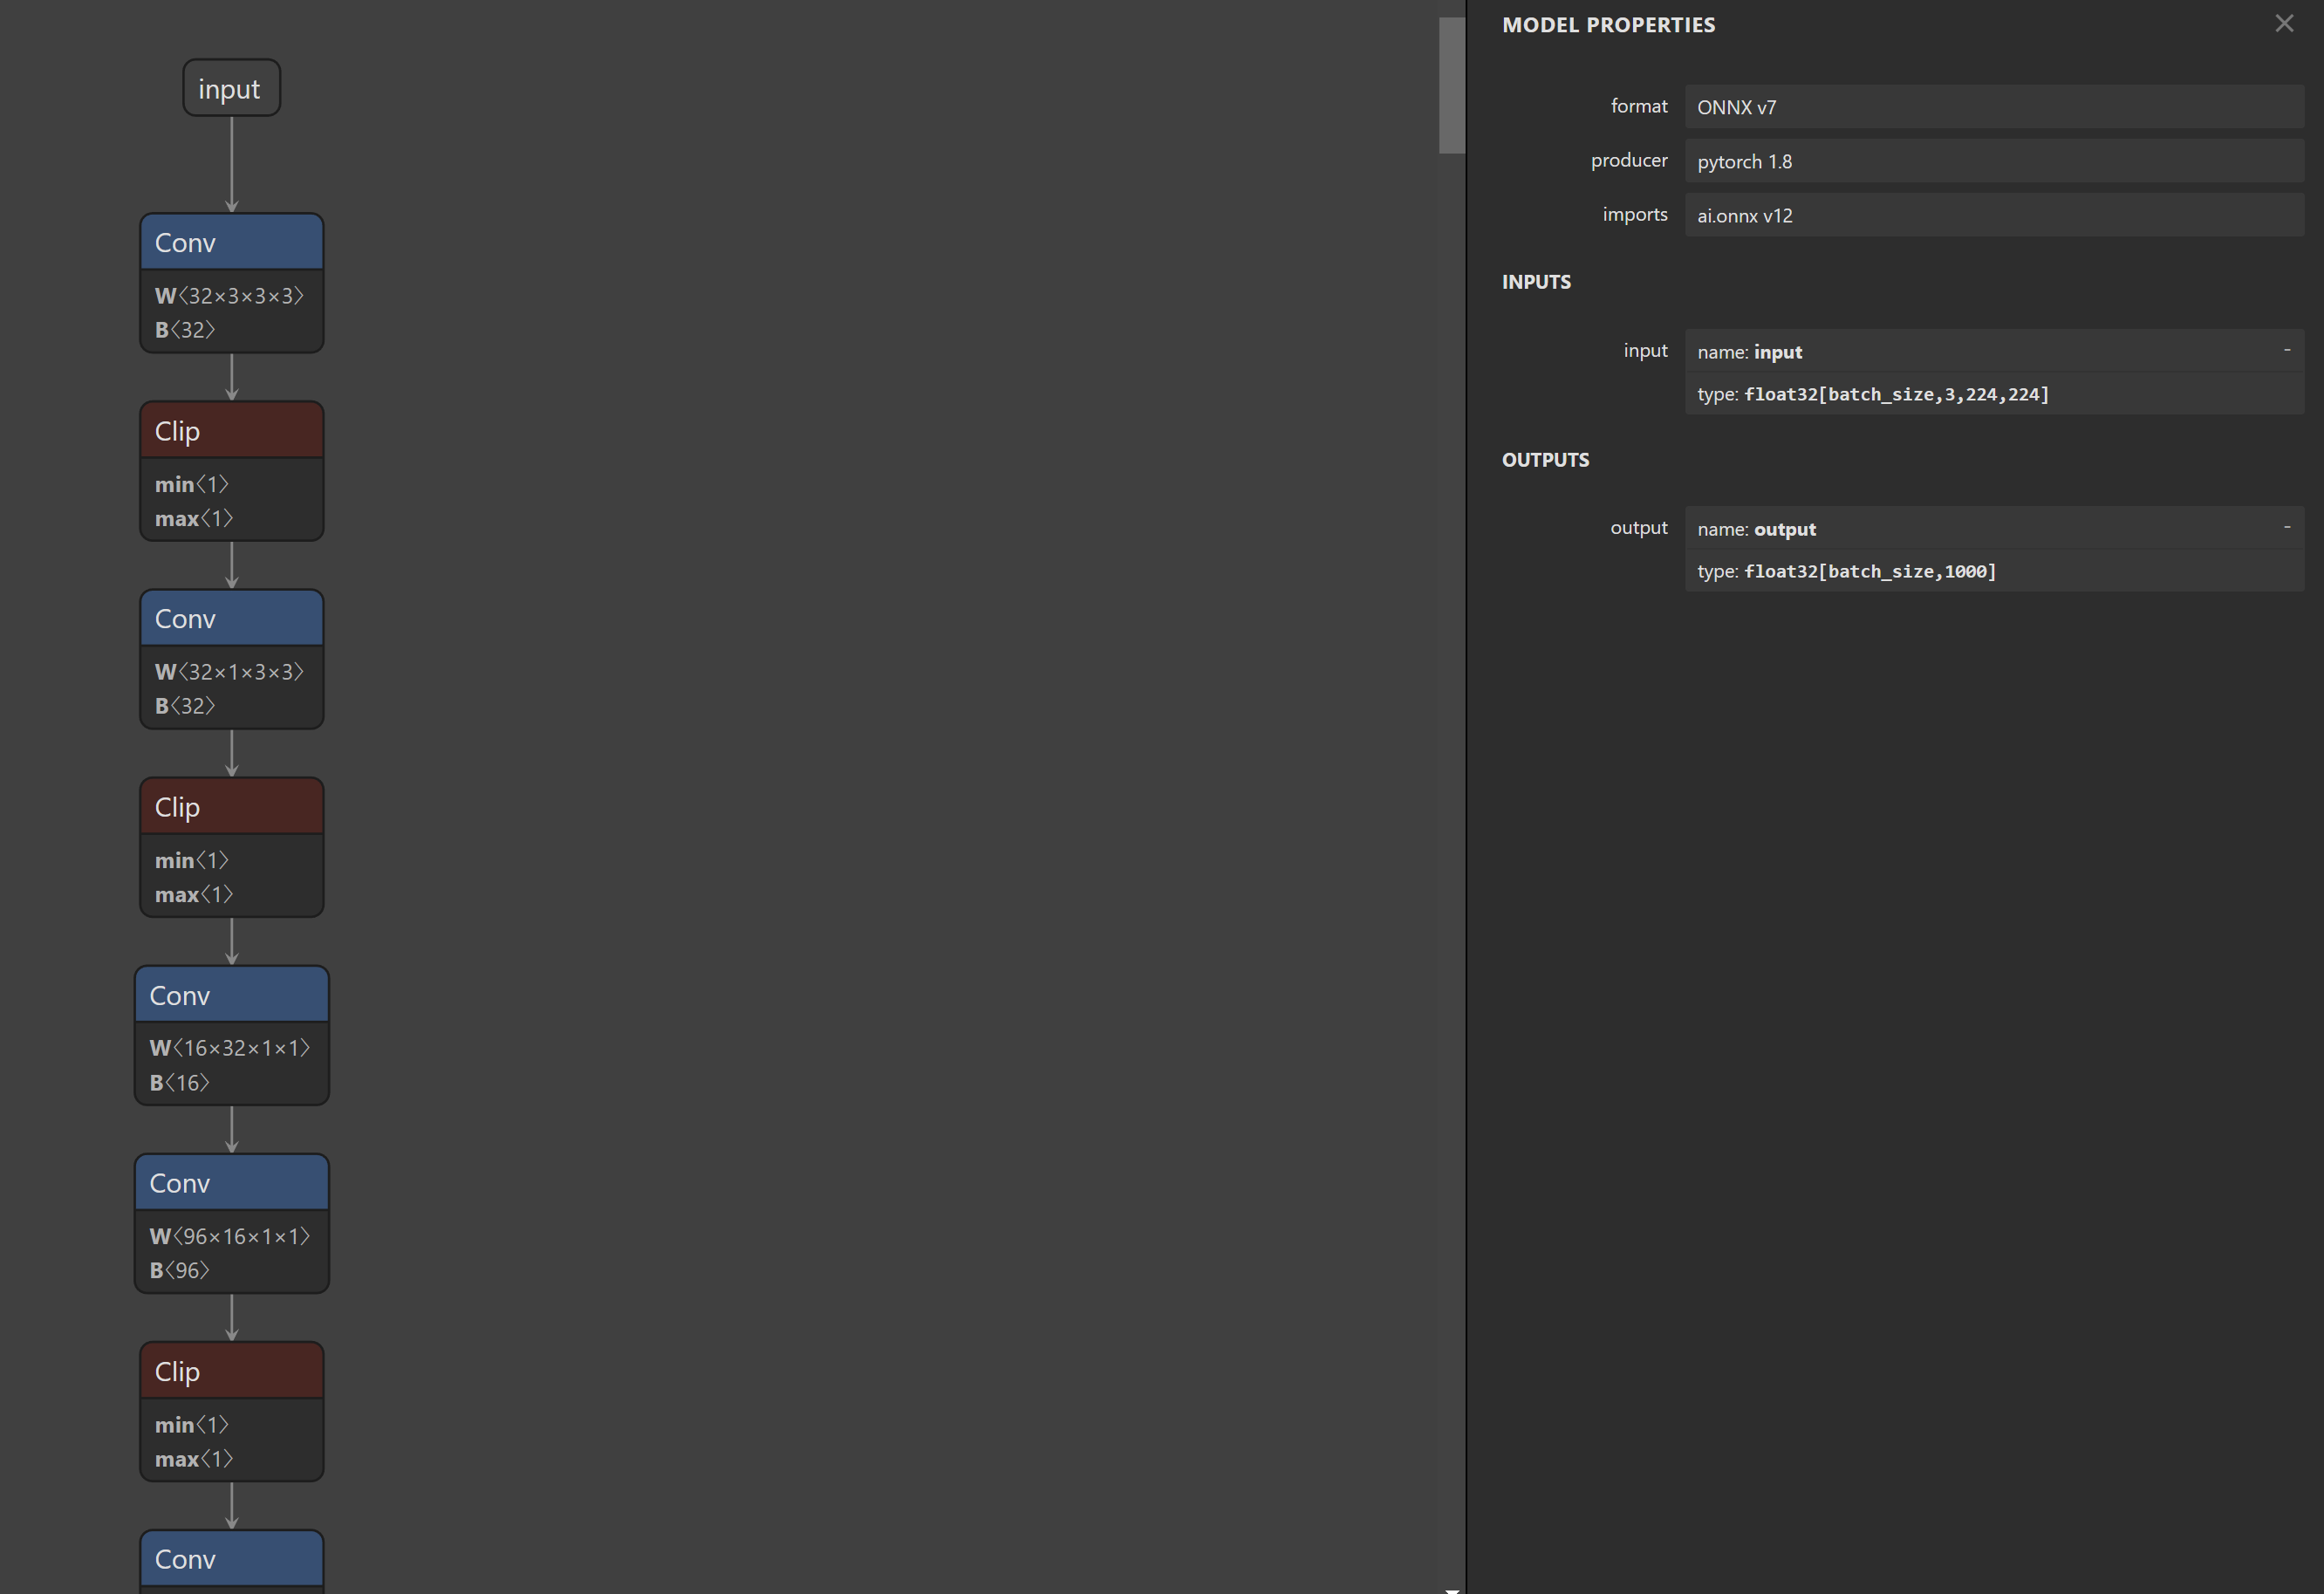
mobileNetV2-12.onnx 구조를 살펴보면 이전의 모델과는 좀 달리 Relu대신 Clip이라는 layer가 들어와 있는 것을 볼 수 있다.
- mobileNetV2-12.onnx → TF(saved_model.pb) 변환
import onnx # 1.12.0 from onnx_tf.backend import prepare # onnx-tf 1.12.0 # tensorflow-probability 0.18.0 onnx_model_path = "./model.onnx" # your onnx model onnx_model = onnx.load(onnx_model_path) tf_rep = prepare(onnx_model) tf_rep.export_graph("./onnx2tf") # get saved_model.pb - TF(saved_model.pb) → TF-Lite(Calibration Dataset → Uint8 Quantization)
# for saved model
def representative_data_gen():
    image_path = get_image("ImageNet-1000samples")

    for image in image_path :
        image = Image.open(image).convert('RGB').resize((256, 256), Image.ANTIALIAS)
        image = np.array(image).astype(np.float32)
        image_data = image[16:240, 16:240, :].copy() # center crop

        image_data = image_data.transpose([2, 0, 1]) # C, H, W
        mean = np.array([0.079, 0.05, 0]) + 0.406 # 0.485, 0.456, 0.406
        std = np.array([0.005, 0, 0.001]) + 0.224 # 0.229, 0.224, 0.225

        for channel in range(image_data.shape[0]):
            image_data[channel, :, :] = (image_data[channel, :, :] / 255 - mean[channel]) / std[channel] #RGB

        image_data = np.expand_dims(image_data, axis=0) # 1, 3, 224, 224
        print(image_data.shape)

        yield [image_data]


converter = tf.lite.TFLiteConverter.from_saved_model(model)
# This enables quantization
converter.optimizations = [tf.lite.Optimize.DEFAULT]
# This sets the representative dataset for quantization
converter.representative_dataset = representative_data_gen
# This ensures that if any ops can't be quantized, the converter throws an error
converter.target_spec.supported_ops = [tf.lite.OpsSet.TFLITE_BUILTINS_INT8]
# For full integer quantization, though supported types defaults to int8 only, we explicitly declare it for clarity.
converter.target_spec.supported_types = [tf.int8]
# These set the input and output tensors to uint8 (added in r2.3)
converter.inference_input_type = tf.uint8
converter.inference_output_type = tf.uint8
converter.allow_custom_op = True
tflite_model = converter.convert()

with open('from_onnx_mobilenet_v2_quant_uint8.tflite', 'wb') as f:
  f.write(tflite_model)
전체 코드
Code
import tensorflow as tf # 2.10.0
import numpy as np # 1.23.2
from PIL import Image # 9.3.0
import os
def get_image(image_dirs) :
image_list = []
for roots, dirs, files in os.walk(image_dirs) :
for file in files :
image_dir = os.path.join(roots, file)
if image_dir.endswith("png") or image_dir.endswith("jpg") or image_dir.endswith("JPEG") :
image_list.append(image_dir)
return image_list
# for saved model
def representative_data_gen():
image_path = get_image("ImageNet-1000samples")
for image in image_path :
image = Image.open(image).convert('RGB').resize((256, 256), Image.ANTIALIAS)
image = np.array(image).astype(np.float32)
image_data = image[16:240, 16:240, :].copy() # center crop
image_data = image_data.transpose([2, 0, 1]) # C, H, W
mean = np.array([0.079, 0.05, 0]) + 0.406 # 0.485, 0.456, 0.406
std = np.array([0.005, 0, 0.001]) + 0.224 # 0.229, 0.224, 0.225
for channel in range(image_data.shape[0]):
image_data[channel, :, :] = (image_data[channel, :, :] / 255 - mean[channel]) / std[channel] #RGB
image_data = np.expand_dims(image_data, axis=0) # 1, 3, 224, 224
print(image_data.shape)
yield [image_data]
model = "./onnx2tf"
converter = tf.lite.TFLiteConverter.from_saved_model(model)
# This enables quantization
converter.optimizations = [tf.lite.Optimize.DEFAULT]
# This sets the representative dataset for quantization
converter.representative_dataset = representative_data_gen
# This ensures that if any ops can't be quantized, the converter throws an error
converter.target_spec.supported_ops = [tf.lite.OpsSet.TFLITE_BUILTINS_INT8]
# For full integer quantization, though supported types defaults to int8 only, we explicitly declare it for clarity.
converter.target_spec.supported_types = [tf.int8]
# These set the input and output tensors to uint8 (added in r2.3)
converter.inference_input_type = tf.uint8
converter.inference_output_type = tf.uint8
converter.allow_custom_op = True
tflite_model = converter.convert()
with open('from_onnx_mobilenet_v2_quant_uint8.tflite', 'wb') as f:
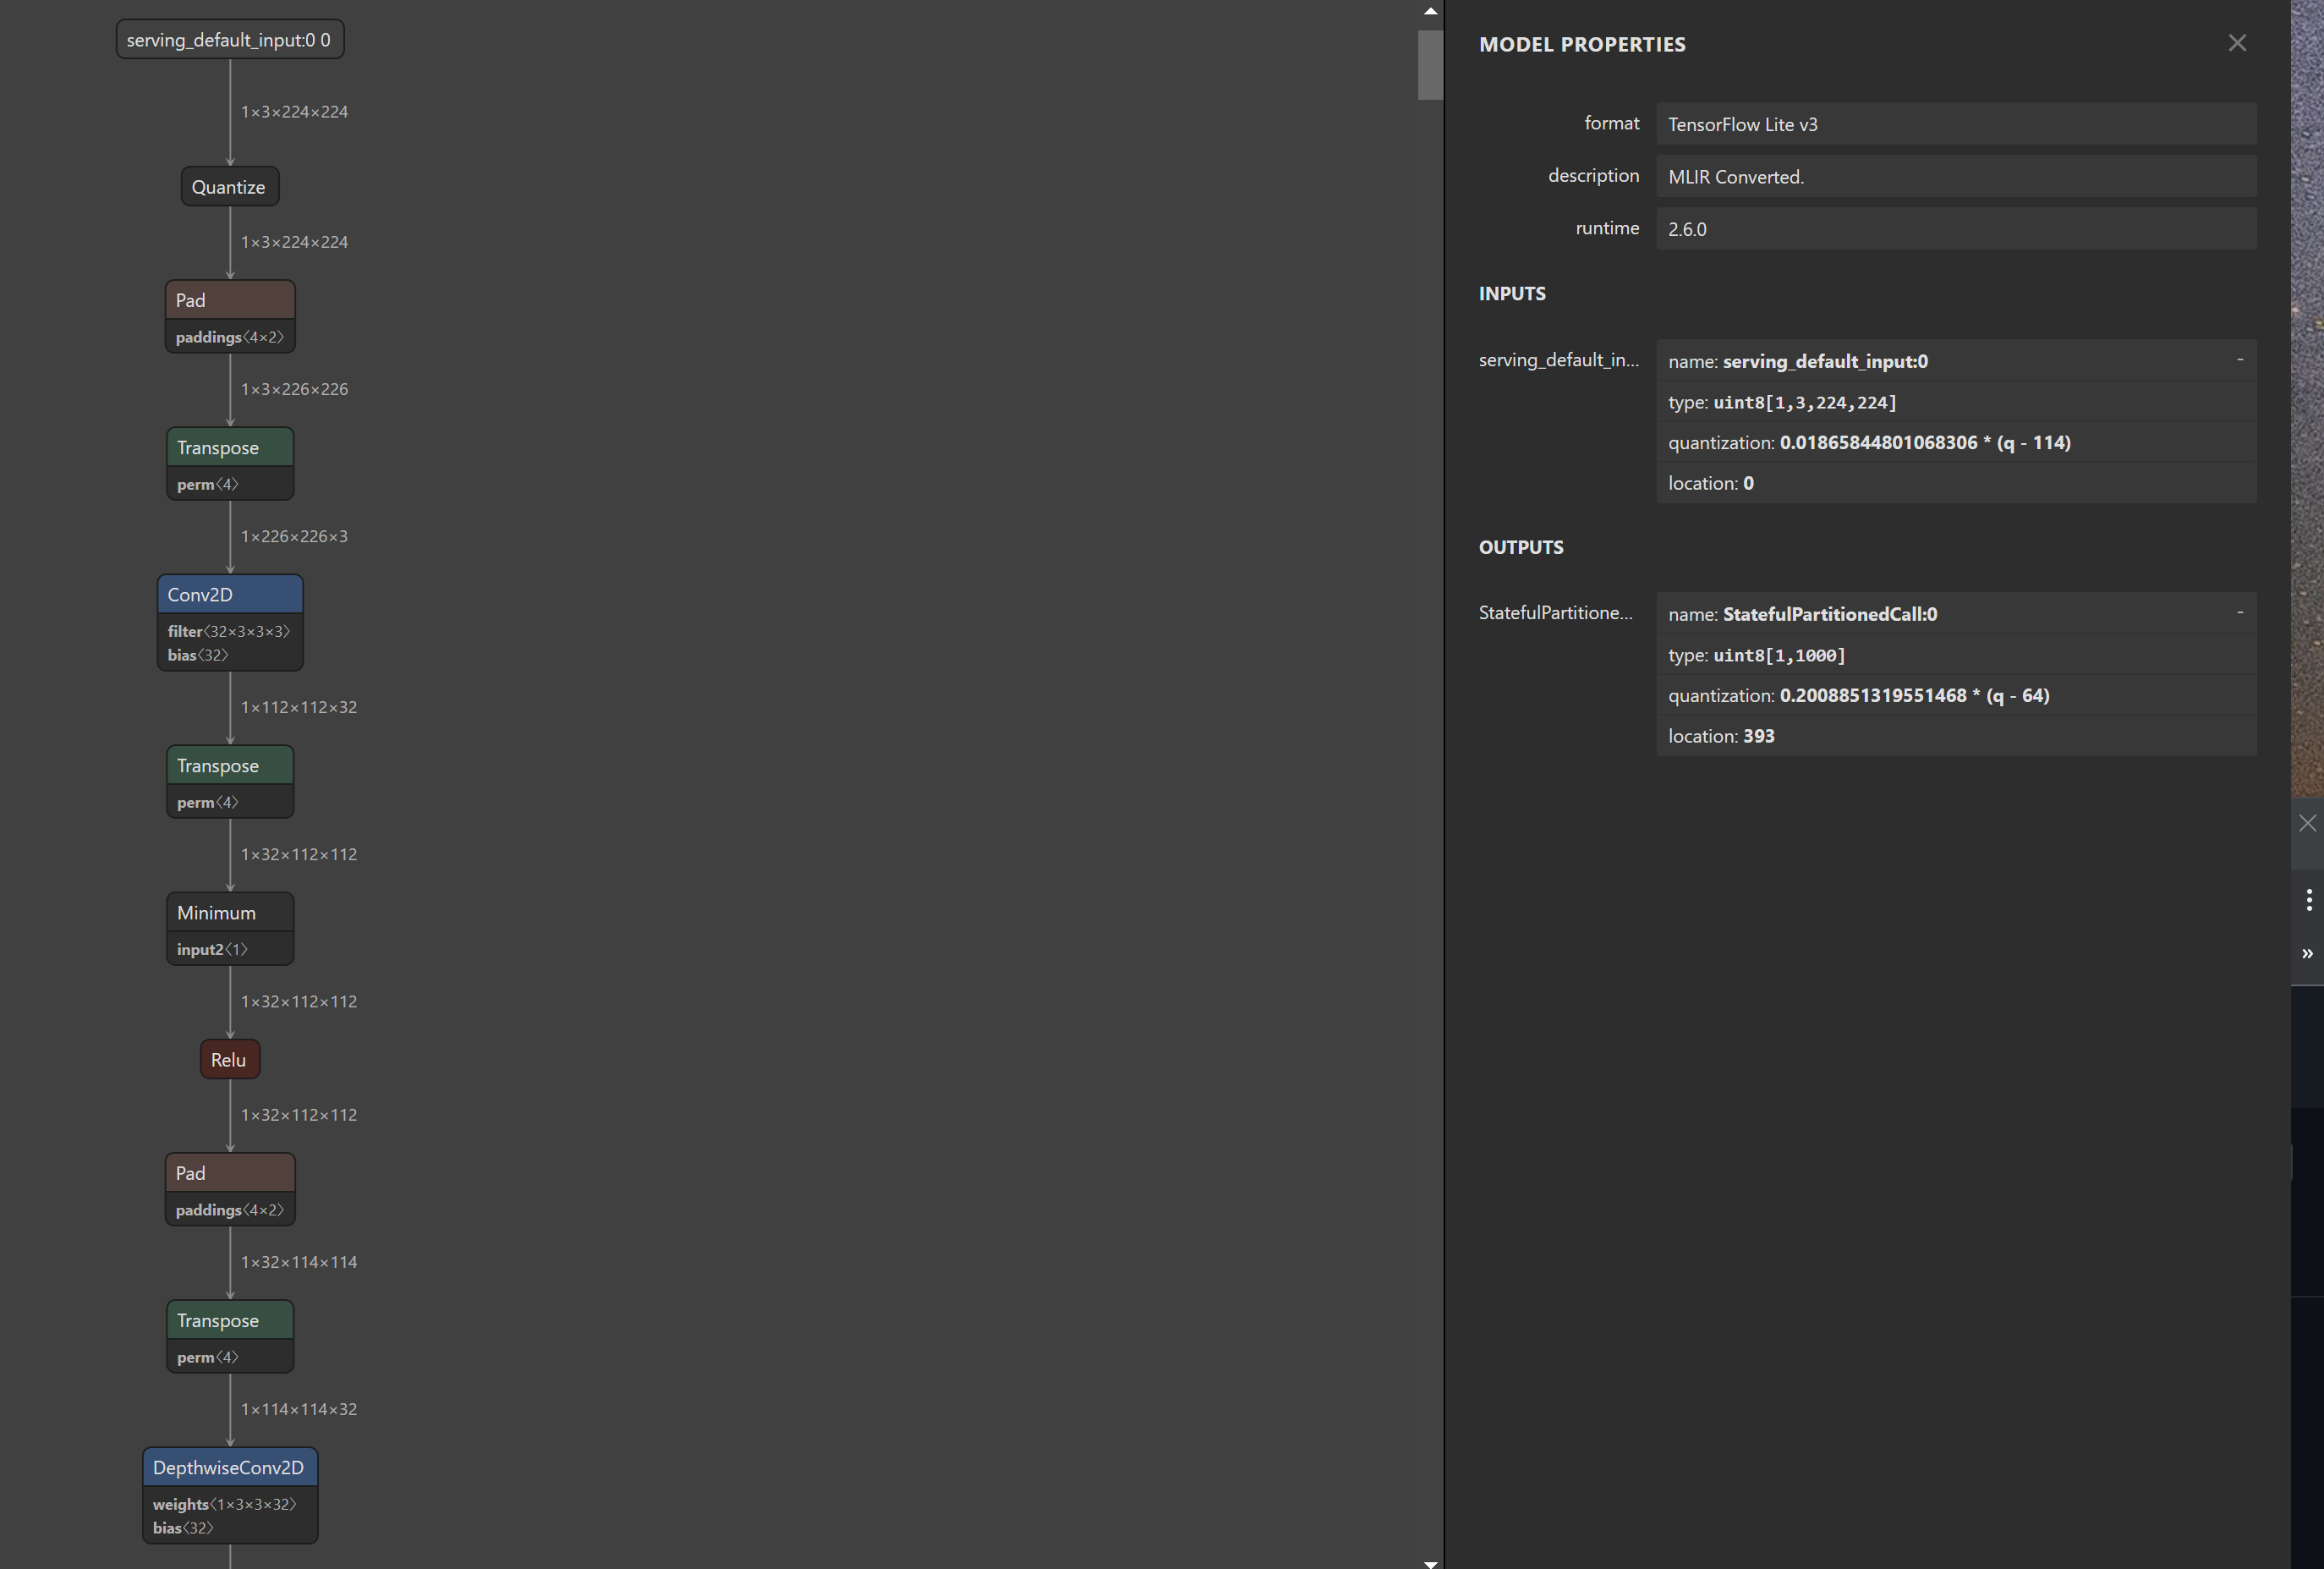
f.write(tflite_model)위에 Coral과 Keras에서 제공했던 TF-Lite구조가 많이 다른데, 개인적인 생각으로는 Clip layer때문에 ONNX → TF로 Convert된 Saved_model.pb이 Clip 기능을 아래와 같은 구조를 갖는 layer로 만들기 때문이 아닐까 생각이 든다.
TPU Compile
TFlite(uint8 quantization)이 끝났다면 이제 TPU에서 사용할 수 있도록 컴파일해야 한다.
Requirements (22.11.23 기준)
- The Edge TPU Compiler can be run on any modern Debian-based Linux system. Specifically, you must have the following:
- 64-bit version of Debian 6.0 or higher, or any derivative thereof (such as Ubuntu 10.0+)
- x86-64 system architecture
- If your system does not meet these requirements, try our web-based compiler using Google Colab.
https://coral.ai/docs/edgetpu/compiler/#system-requirements
요구사항이 충족되면 아래 링크의 명령어를 이용해 컴파일 할 수 있다. 나는 코랩을 추천한다. (코랩에서 사용하기)
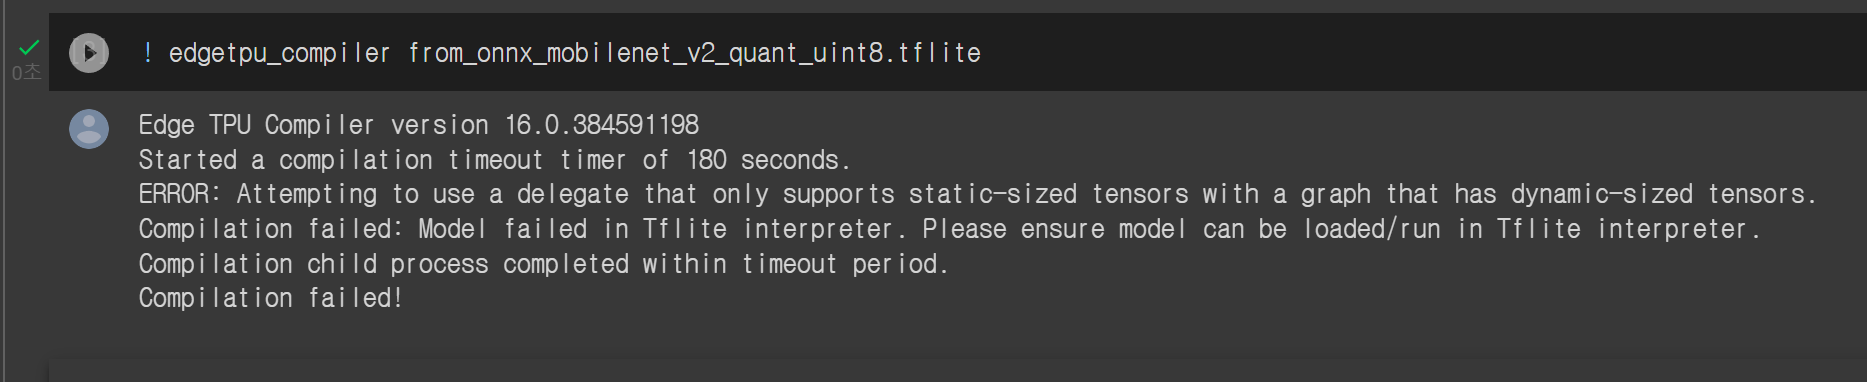
컴파일을 시도하면 실패하는 것을 볼 수 있다.
ERROR: Attempting to use a delegate that only supports static-sized tensors with a graph that has dynamic-sized tensors.
Compile에 실패하는 이유
예상되는 실패의 이유는 컴파일 되려는 모델의
- Operation이 TPU에서 지원하지 않는다.
- Layer가 dynamic shape을 가지고 있다.
나의 경우는 전자이다, ONNX 모델의 layer중 Coral TPU에서 지원하지 않는 Operator가 있기 때문이다.
https://coral.ai/docs/edgetpu/models-intro/#supported-operations
지원 Operator은 위에 링크에서 볼 수 있다.
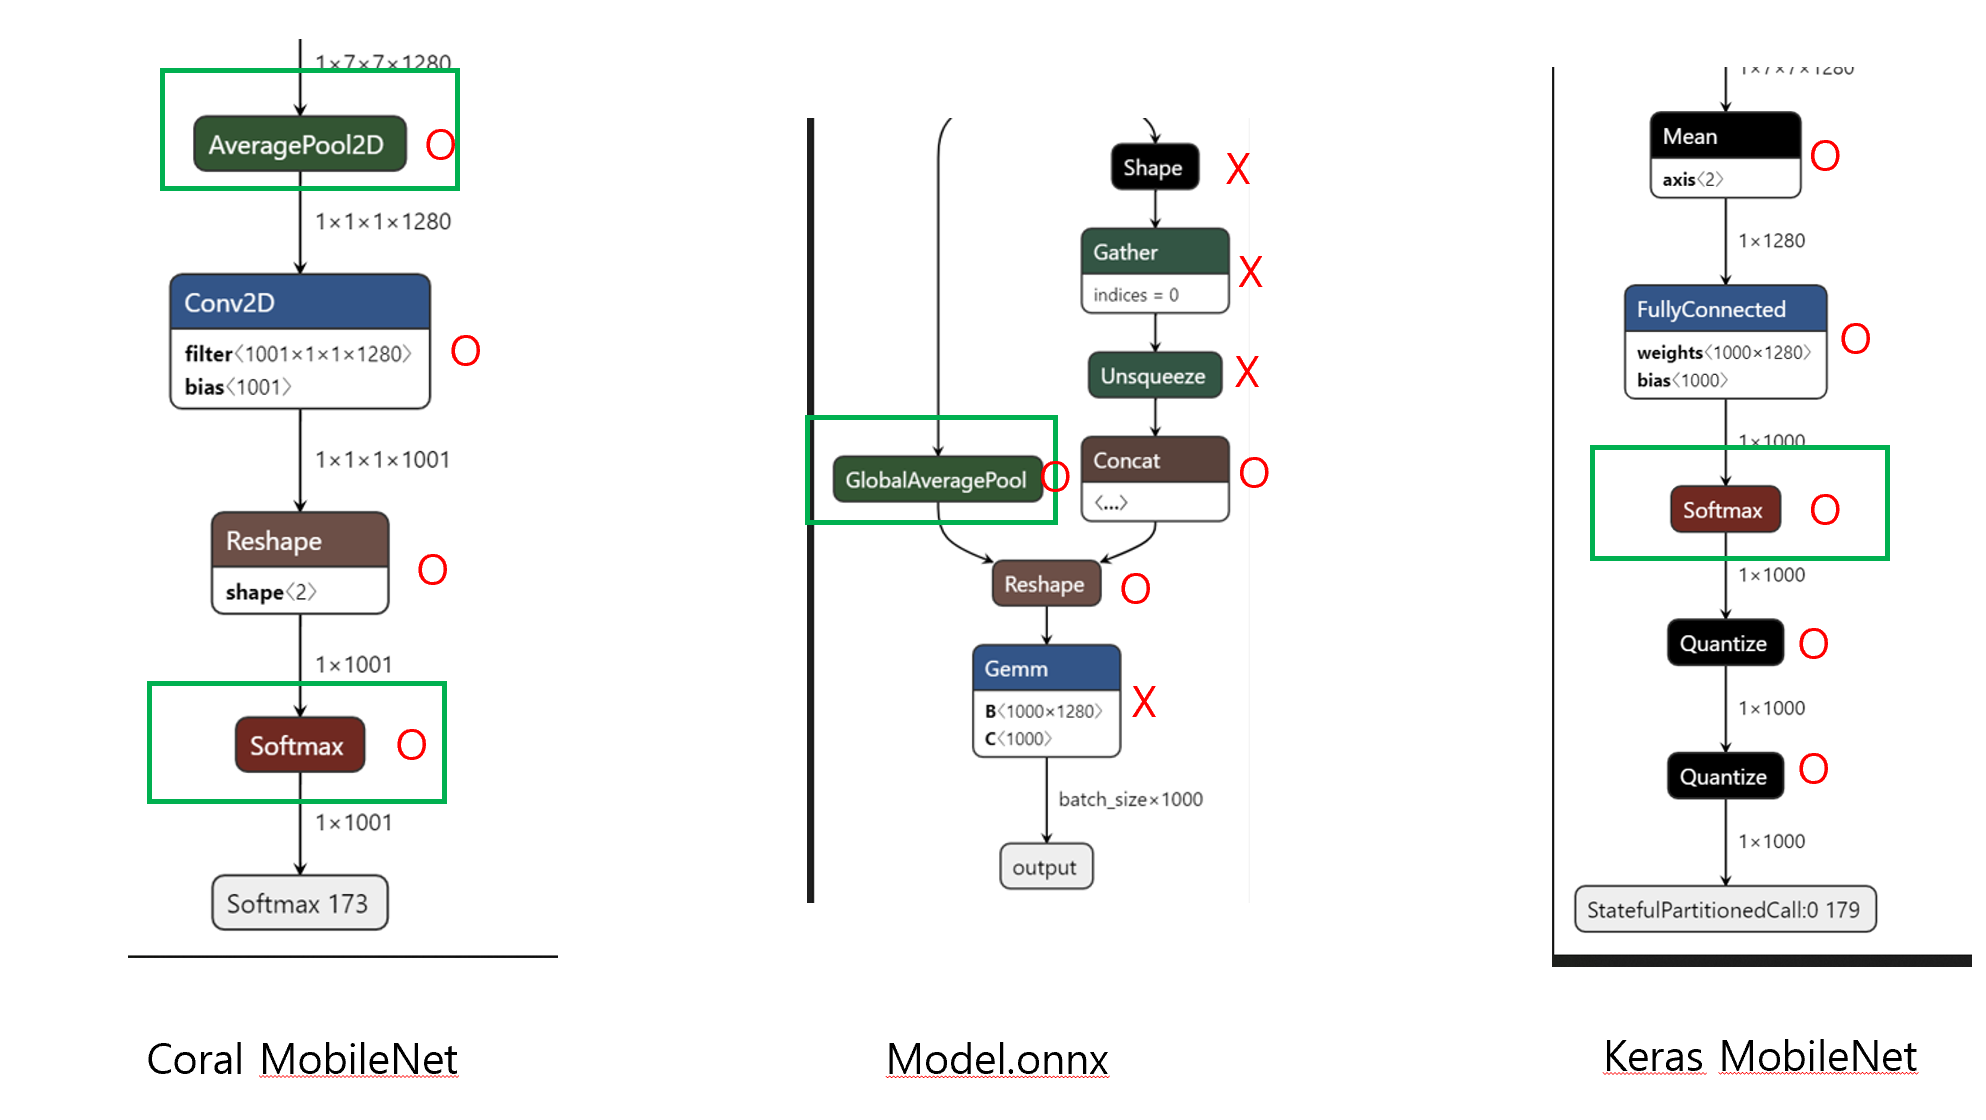
Model.ONNX에서 출력부분에서 Coral에서 TPU사용에 지원되지 않는 Operator(Shape, Gather, Unsqueeze, Gemm)가 존재 했기 때문에 당연히 변환된 TF-Lite파일도 지원되지 않는 Operator가 있기 마련이다.
아래 파일은 Coral(TF-Lite), ONNX(onnx), Keras(TF-Lite)에서 지원하는 MobileNet의 모델을 분석한 결과이다.
간략히 설명하면 각 모델의 출력부분인데 Coral, Keras는 해당 Operator를 Coral에서 전부 지원하는 반면, Model.ONNX는 지원되지 않는 Operator가 있다.
(2022년 11월 23일 기준으로는 지원 안 함 → 추후엔 지원해줄 수도 있음)
혹시나 하여 모델이 잘못 변형될 수도 있겠다는 생각이 들어 TPU Compile하지 않고 TF-Lite로만 Raspi에서 돌렸을 때 잘 작동한다.
아래 코드는 Coral에서 제공한 classify_image.py를 참고해 수정했다. (TF 버전이 맞지 않으면 에러가 날 수도 있다.)
- PC에서 시도해보니(tf 2.5.0) 다음과 같은 에러가 난다.(Raspi에서는 잘 작동하니 TF버전에 유의하자)
ValueError: Didn't find op for builtin opcode 'ADD' version '4'. An older version of this builtin might be supported. Are you using an old TFLite binary with a newer model?
Registration failed.
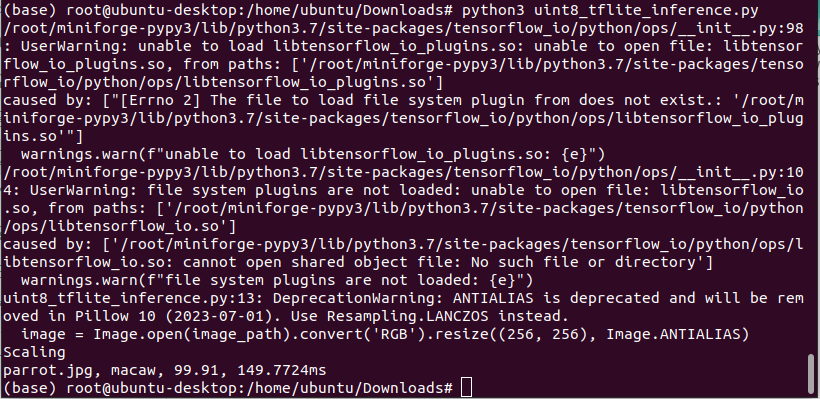
TF-Lite Inferece(Without using TPU)
Code
# has been run by Raspi - python 3.7.12
import os
import numpy as np
from PIL import Image
import tensorflow as tf # 2.10.0
import time


def softmax(x):
    e_x = np.exp(x - np.max(x))
    return e_x / e_x.sum()

def preprocess_image(image_path) :
    image_path = image_path
    image = Image.open(image_path).convert('RGB').resize((256, 256), Image.ANTIALIAS)
    image_data = np.array(image)
    image_data = image_data[16:240, 16:240, :].copy()
    image_data = image_data.transpose([2, 0, 1]) # C, H, W

    return image_data


with open("imagenet_classes.txt", "r") as f:
    categories = [s.strip() for s in f.readlines()]


interpreter = tf.lite.Interpreter('from_onnx_mobilenet_v2_quant_uint8.tflite')

interpreter.allocate_tensors()

img_path = "parrot.jpg"
data = preprocess_image(img_path)

input_details = interpreter.get_input_details()
output_details = interpreter.get_output_details()

params = input_details[0]['quantization_parameters']
scale = params['scales']
zero_point = params['zero_points']

mean = 128.0
std = 128.0
data = np.expand_dims(data, axis=0)

if abs(scale * std - 1) < 1e-5 and abs(mean - zero_point) < 1e-5:
    interpreter.set_tensor(input_details[0]['index'], data)
    print("No_Scaling")
else:
    normalized_input = (np.asarray(data) - mean) / (std * scale) + zero_point
    np.clip(normalized_input, 0, 255, out=normalized_input)
    interpreter.set_tensor(input_details[0]['index'], normalized_input.astype(np.uint8))
    print("Scaling")

start = time.perf_counter()
interpreter.invoke()
end = time.perf_counter()

inference_time = (end-start)*1000

output_data = interpreter.get_tensor(output_details[0]['index'])

scale, zero_point = output_details[0]['quantization']
output_data = scale * (output_data.astype(np.int64) - zero_point)
max_idx = np.argmax(output_data[0])
confidence = softmax(output_data[0])

print(f"{img_path}, {categories[max_idx]}, {confidence[max_idx]*100:.2f}, {inference_time:.4f}ms")아래는 Raspiberry에서 구동한 결과이다.
연구 결론
Coral-TPU는 모델의 Operator를 전부 TPU에서 작업을 처리하려 하기 때문에 지원하지 않는 Operator가 있으면 해당 모델은 TPU를 사용할 수조차 없다.
다양한 모델을 사용해야 한다면 지원하지 않는 Operator들은 CPU가 처리하고 지원하는 Operator는 TPU가 처리하면 좋을 것 같다.
Comment