
서론
이 장은 M1 Mac silicon기반의 아키텍처에서 Tensorflow-gpu를 설치하는 방법을 소개한다.
Python Version : 3.10
Tensorflow Version : 2.10.0
목차
- 1. Install Homebrew
- 2. Install XCode
- 3. Download Miniforge
- 4. Install Miniforge3
- 5. Make Virtual Environment by using Conda
- 6. Install Tensorflow deps
- 7. Use Tensorflow on Jupyter
Requirments for Linux/Mac
https://www.tensorflow.org/install/source#gpu
1. Install Homebrew
$ bin/bash -c "$(curl -fsSL https://raw.githubusercontent.com/Homebrew/install/HEAD/install.sh)"2. Install XCode
$ Xcode-select --install3. Download Miniforge
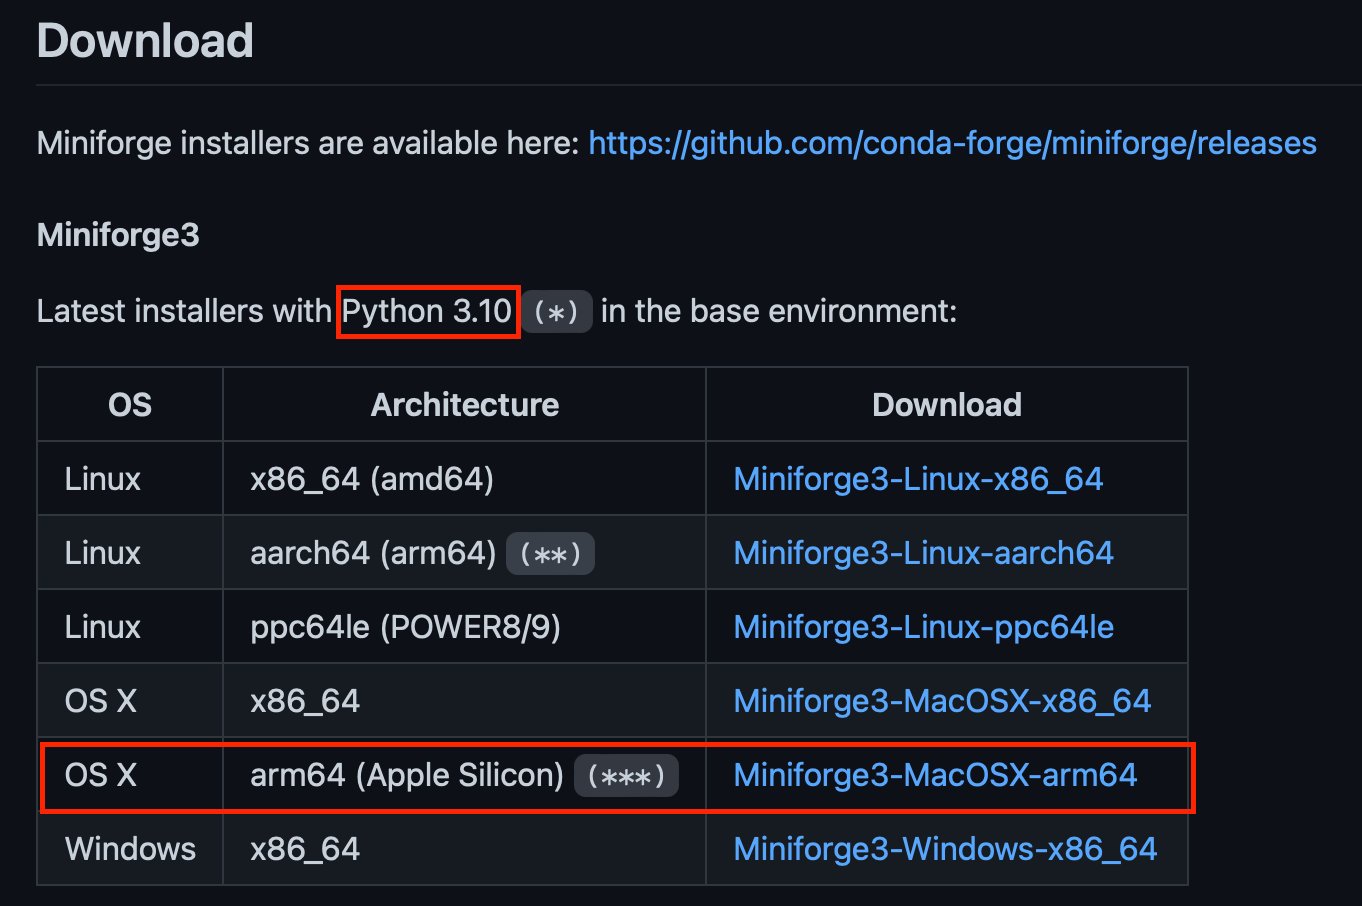
https://github.com/conda-forge/miniforge
4. Install Miniforge3
$ cd Downloads
$ chmod +x Miniforge3-MacOSX-arm64.sh
$ ./Miniforge3-MacOSX-arm64.sh
5. Make Virtual Environment by using Conda
$ conda create –n tf python==3.10
$ conda activate tf
6. Install Tensorflow deps
(tf)$ conda install -c apple tensorflow-deps6-1. Install Tensorflow
(tf)$ python3 -m pip install tensorflow-macos
(tf)$ pip3 install tensorflow-metal
7. Use Tensorflow on Jupyter
jupyter notebook과 lab중 원하는 것을 설치하자
7-1 Install Jupyter notebook
(tf)$ conda install jupyter notebook
(tf)$ jupyter notebook --generate-config
(tf)$ jupyter notebook
7-2 Change Jupyter start-up folder
jupyter_notebook_config.py을 열고 주석을 해제해 원하는 경로를 입력한다.
c.NotebookApp.notebook_dir = '/Users/$yourName$/Documents/Code'7-3 Change Jupyter Theme
(tf)$ conda install -c conda-forge jupyterthemes
(tf)$ jt -l
(tf)$ jt -t chesterish
7-4 설치확인
(tf)$ conda list | grep tensorflow
이렇게 뜨면 잘 설치가 된 것이고 안 뜬다면 6-1과정(바로가기)을 다시 설치한다.
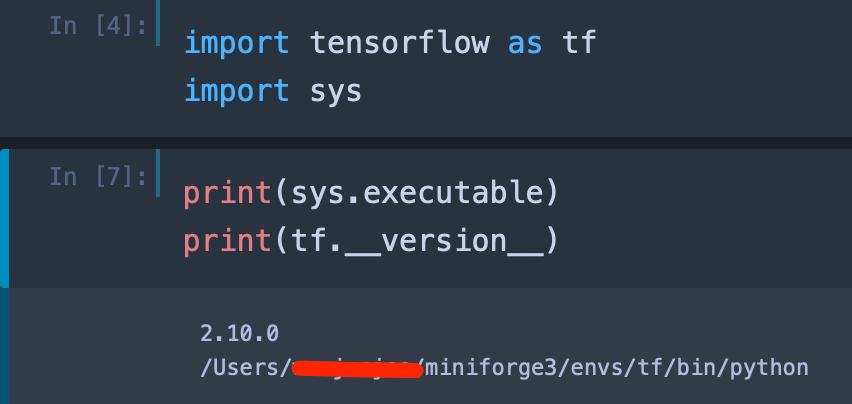
설치가 잘 되었다면 주피터를 열고 다음과 같이 입력해 확인하자
sys.executable은 현재 주피터에서 인식하고 있는 파이썬 경로다.
Comment